Search for:
The Blog App and its deployment configuration – Continuous Deployment/ Delivery with Argo CD

Since we discussed the Blog App in the last chapter, let’s look at the services and their interactions again:

Figure 12.5 – The Blog App and its services and interactions

So far, we’ve created CI pipelines for building, testing, and pushing our Blog App microservice containers. These microservices need to run somewhere. So, we need an environment for this. We will deploy the application in a GKE cluster; for that, we will need a Kubernetes YAML manifest. We built the container for the posts microservice as an example in the previous chapter, and I also left building the rest of the services as an exercise for you. Assuming you’ve built them, we will need the following resources for the application to run seamlessly:

  • MongoDB: We will deploy an auth-enabled MongoDB database with root credentials. The credentials will be injected via environment variables sourced from a Kubernetes Secret resource. We also need to persist our database data, so for that, we need a PersistentVolume mounted to the container, which we will provision dynamically using a PersistentVolumeClaim. As the container is stateful, we will use a StatefulSet to manage it and, therefore, a headless Service to expose the database.
  • Posts, reviews, ratings, and users: The posts, reviews, ratings, and users microservices will interact with MongoDB through the root credentials injected via environment variables sourced from the same Secret as MongoDB. We will deploy them using their respective Deployment resources and expose all of them via individual ClusterIP Services.
  • Frontend: The frontend microservice does not need to interact with MongoDB, so there will be no interaction with the Secret resource. We will also deploy this service using a Deployment resource. As we want to expose the service on the internet, we will create a LoadBalancer Service for it.

We can summarize these aspects with the following diagram:
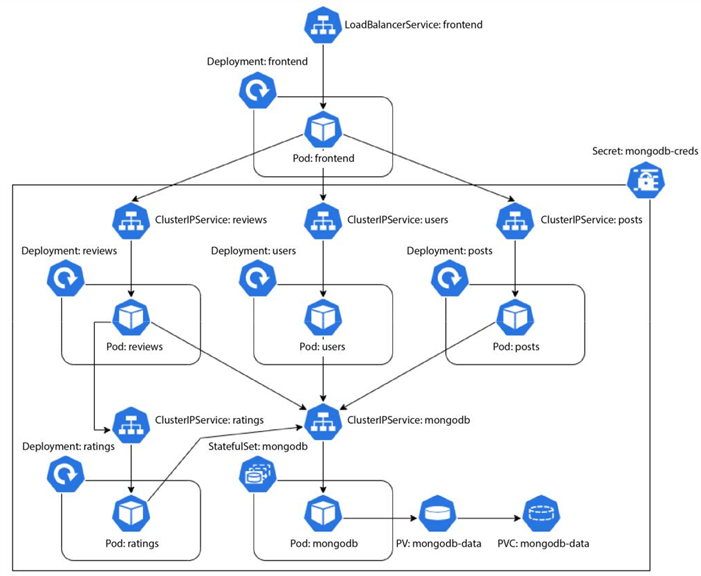
Figure 12.6 – The Blog App – Kubernetes resources and interactions

Now, as we’re following the GitOps model, we need to store the manifests of all the resources on Git. However, since Kubernetes Secrets are not inherently secure, we cannot store their manifests directly on Git. Instead, we will use another resource called SealedSecrets to manage this securely.

In Chapter 2, Source Code Management with Git and GitOps, we discussed application and environment repositories forming the fundamental building blocks of GitOps-based CI and CD, respectively. In the previous chapter, we created an application repository on GitHub and used GitHub Actions (and Jenkins) to build, test, and push our application container to Docker Hub. As CD focuses on the Ops part of DevOps, we will need an Environment repository to implement it, so let’s go ahead and create our Environment repository in the next section.

Complex deployment models – Continuous Deployment/ Delivery with Argo CD

Complex deployment models, unlike simple deployment models, try to minimize disruptions and downtimes within the application and make rolling out releases more seamless to the extent that most users don’t even notice when the upgrade is being conducted. Two main kinds of complex deployments are prevalent in the industry; let’s take a look.

Blue/Green deployments

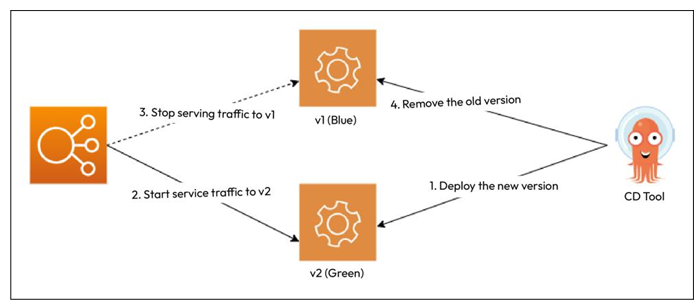
Blue/Green deployments (also known as Red/Black deployments) roll out the new version (Green) in addition to the existing version (Blue). You can then do sanity checks and other activities with the latest version to ensure that everything is good to go. Then, you can switch traffic from the old to the new version and monitor for any issues. If you encounter problems, you switch back traffic to the old version. Otherwise, you keep the latest version running and remove the old version:

Figure 12.3 – Blue/Green deployments

You can take Blue/Green deployments to the next level using canary deployments.

Canary deployments and A/B testing

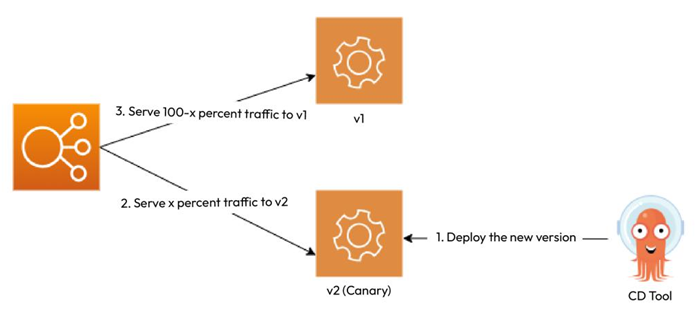
Canary deployments are similar to Blue/Green deployments but are generally utilized for risky upgrades. So, like Blue/Green deployments, we deploy the new version alongside the existing one. Instead of switching all traffic to the latest version at once, we only switch traffic to a small subset of users. As we do that, we can understand from our logs and user behaviors whether the switchover is causing any issues. This is calledA/B testing. When we do A/B testing, we can target a specific group of users based on location, language, age group, or users who have opted to test Beta versions of a product. That will help organizations gather feedback without disrupting general users and make changes to the product once they’re satisfied with what they are rolling out. You can make the release generally available by switching over the total traffic to the new version and getting rid of the old version:

Figure 12.4 – Canary deployments

While complex deployments cause the least disruption to users, they are generally complex to manage using traditional CI tools such as Jenkins. Therefore, we need to get the tooling right on it. Several CD tools are available in the market, including Argo CD, Spinnaker, Circle CI, and AWS Code Deploy. As this entire book is focused on GitOps, and Argo CD is a GitOps native tool, for this chapter, we will focus on Argo CD. Before we delve into deploying the application, let’s revisit what we want to deploy.

CD models and tools – Continuous Deployment/ Delivery with Argo CD

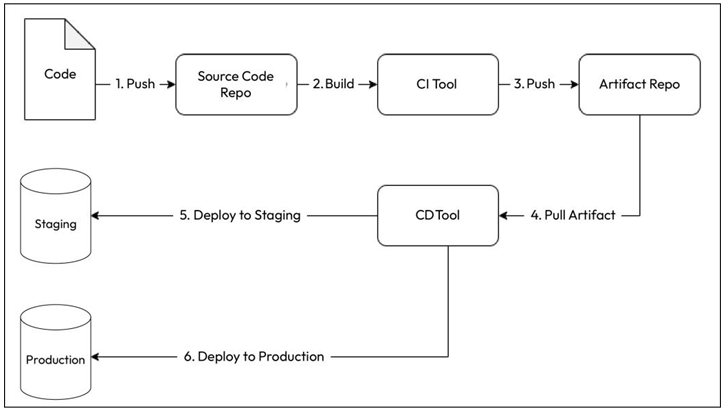
A typical CI/CD workflow looks as described in the following figure and the subsequent steps:

Figure 12.1 – CI/CD workflow

  1. Your developers write code and push it to a code repository (typically a Git repository).
  2. Your CI tool builds the code, runs a series of tests, and pushes the tested build to an artifact repository. Your CD tool then picks up the artifact and deploys it to your test and staging environments. Based on whether you want to do continuous deployment or delivery, it automatically deploys the artifact to the production environment.

Well, what do you choose for a delivery tool? Let’s look at the example we covered in Chapter 11, Continuous Integration. We picked up the posts microservice app and used a CI tool such as GitHubActions/Jenkins that uses Docker to create a container out of it and push it to our Docker Hub container registry. Well, we could have used the same tool for deploying to our environment.

For example, if we wanted to deploy to Kubernetes, it would have been a simple YAML update and kubectl apply. We could easily do this with any of those tools, but we chose not to do it. Why? The answer is simple – CI tools are meant for CI, and if you want to use them for anything else, you’ll get stuck at a certain point. That does not mean that you cannot use these tools for CD. It will only suit a few use cases based on the deployment model you follow.

Several deployment models exist based on your application, technology stack, customers, risk appetite, and cost consciousness. Let’s look at some of the popular deployment models that are used within the industry.

Simple deployment model

The simple deployment model is one of the most straightforward of all: you deploy the required version of your application after removing the old one. It completely replaces the previous version, and rolling back involves redeploying the older version after removing the deployed one:

Figure 12.2 – Simple deployment model

As it is a simple way of deploying things, you can manage this using a CI tool such as Jenkins or GitHub Actions. However, the simple deployment model is not the most desired deployment methodbecause of some inherent risks. This kind of change is disruptive andtypically needs downtime. This means your service would remain unavailable to your customers for the upgrade period. It might be OK for organizations that do not have users 24/7, but disruptions eat into the service-level objectives (SLOs) and service-level agreements (SLAs) of global organizations. Even if there isn’t one, they hamper customer experience and the organization’s reputation.

Therefore, to manage such kinds of situations, we have some complex deployment models.

The importance of CD and automation – Continuous Deployment/ Delivery with Argo CD-2

CD offers several advantages. Some of them are as follows:

  • Faster time to market: CD and CI reduce the time it takes to deliver new features, enhancements, and bug fixes to end users. This agility can give your organization a competitive edge by allowing you to respond quickly to market demands.
  • Reduced risk: By automating the deployment process and frequently pushing small code changes, you minimize the risk of large, error-prone deployments. Bugs and issues are more likely to be caught early, and rollbacks can be less complex.
  • Improved code quality: Frequent automated testing and quality checks are an integral part of CD and CI. This results in higher code quality as developers are encouraged to write cleaner, more maintainable code. Any issues are caught and addressed sooner in the development process.
  • Enhanced collaboration: CD and CI encourage collaboration between development and operations teams. It breaks down traditional silos and encourages cross-functional teamwork, leading to better communication and understanding.
  • Efficiency and productivity: Automation of repetitive tasks, such as testing, building, and deployment, frees up developers’ time to focus on more valuable tasks, such as creating new features and improvements.
  • Customer feedback: CD allows you to gather feedback from real users more quickly. By deploying small changes frequently, you can gather user feedback and adjust your development efforts accordingly, ensuring that your product better meets user needs.
  • Continuous improvement: CD promotes a culture of continuous improvement. By analyzing data on deployments and monitoring, teams can identify areas for enhancement and iterate on their processes.
  • Better security: Frequent updates mean that security vulnerabilities can be addressed promptly, reducing the window of opportunity for attackers. Security checks can be automated and integrated into the CI/CD pipeline.
  • Reduced manual intervention: CD minimizes the need for manual intervention in the deployment process. This reduces the potential for human error and streamlines the release process.
  • Scalability: As your product grows and the number of developers and your code base complexity increases, CD can help maintain a manageable development process. It scales effectively by automating many of the release and testing processes.
  • Cost savings: Although implementing CI/CD requires an initial investment in tools and processes, it can lead to cost savings in the long run by reducing the need for extensive manual testing, lowering deployment-related errors, and improving resource utilization.
  • Compliance and auditing: For organizations with regulatory requirements, CD can improve compliance by providing a detailed history of changes and deployments, making it easier to track and audit code changes.

It’s important to note that while CD and CI offer many advantages, they also require careful planning, infrastructure, and cultural changes to be effective.

There are several models and tools available to implement CD. We’ll have a look at some of them in the next section.

The importance of CD and automation – Continuous Deployment/ Delivery with Argo CD-1

CD forms the Ops part of your DevOps toolchain. So, while your developers are continuously building and pushing code and your CI pipeline is building, testing, and publishing the builds to your artifact repository, the Ops team will deploy the build to the test and staging environments. The QA team is the gatekeeper that will ensure that the code meets a certain quality, and only then will the Ops team deploy the code to production.

Now, for organizations implementing only the CI part, the rest of the activities are manual. For example, operators will pull the artifacts and run commands to do the deployments manually. Therefore, your deployment’s velocity will depend on the availability of your Ops team to do it. As the deployments are manual, the process is error-prone, and human beings tend to make mistakes in repeatable jobs.

One of the essential principles of modern DevOps is to avoid toil. Toil is nothing but repeatable jobs that developers and operators do day in and day out, and all of that toil can be removed by automation. This will help your team focus on the more important things at hand.

With continuous delivery, standard tooling can deploy code to higher environments based on certain gate conditions. CD pipelines will trigger when a tested build arrives at the artifact repository or, in the case of GitOps, if any changes are detected in the Environment repository. The pipeline then decides, based on a set configuration, where and how to deploy the code. It also establishes whether manual checks are required, such as raising a change ticket and checking whether it’s approved.

While continuous deployment and delivery are often confused with being the same thing, there is a slight difference between them. Continuous delivery enables your team to deliver tested code in your environment based on a human trigger. So, while you don’t have to do anything more than click a button to do a deployment to production, it would still be initiated by someone at a convenient time (a maintenance window). Continuous deployments go a step further when they integrate with the CI process and will start the deployment process as soon as a new tested build is available for them to consume. There is no need for manual intervention, and continuous deployment will only stop in case of a failed test.

The monitoring tool forms the next part of the DevOps toolchain. The Ops team can learn from managing their production environment and provide developers with feedback regarding what they need to do better. That feedback ends up in the development backlog, and they can deliver it as features in future releases. That completes the cycle, and now you have your team churning out a technology product continuously.

Technical requirements – Continuous Deployment/ Delivery with Argo CD

In the previous chapter, we looked at one of the key aspects of modern DevOps – continuous integration (CI ). CI is the first thing most organizations implement when they embrace DevOps,but things don’t end with CI, which only delivers a tested build in an artifact repository. Instead, we would also want to deploy the artifact to our environments. In this chapter, we’ll implement the next part of the DevOps toolchain – continuous deployment/delivery (CD).

In this chapter, we’re going to cover the following main topics:

  • The importance of CD and automation
  • CD models and tools
  • The Blog App and its deployment configuration
  • Continuous declarative IaC using an Environment repository
  • Introduction to Argo CD
  • Installing and setting up Argo CD
  • Managing sensitive configurations and secrets
  • Deploying the sample Blog App

Technical requirements

In this chapter, we will spin up a cloud-based Kubernetes cluster, Google Kubernetes Engine (GKE), for the exercises. At the time of writing, Google Cloud Platform (GCP) provides a free $300 trial for 90 days, so you can go ahead and sign up for one at https://console.cloud.google.com/.

You will also need to clone the following GitHub repository for some exercises: https://github.

com/PacktPublishing/Modern-DevOps-Practices.

Run the following command to clone the repository into your home directory, and cd into the ch12 directory to access the required resources:

$ git clone https://github.com/PacktPublishing/Modern-DevOps-Practices-2e.git \ modern-devops

$ cd modern-devops/ch12

So, let’s get started!

Utilize cloud-based CI/CD – Continuous Integration with GitHub Actions and Jenkins

Consider adopting cloud -based CI/CD services such as AWS CodePipeline, Google Cloud Build, Azure DevOps, or Travis CI for enhanced scalability and performance. Harness on-demand cloud resources to expand parallelization capabilities and adapt to varying workloads.

Monitor and profile your CI/CD pipelines

Implement performance monitoring and profiling tools to identify bottlenecks and areas for improvement within your CI/CD pipeline. Regularly analyze build and test logs to gather insights for optimizing performance.

Pipeline optimization

Continuously review and optimize your CI/CD pipeline configuration for efficiency and relevance.

Remove unnecessary steps or stages that do not contribute significantly to the process.

Implement automated cleanup

Implement automated cleanup routines to remove stale artifacts, containers, and virtual machines, preventing resource clutter. Regularly purge old build artifacts and unused resources to maintain a tidy environment.

Documentation and training

Document best practices and performance guidelines for your CI/CD processes, ensuring that the entire team follows these standards consistently. Provide training and guidance to team members to empower them to implement and maintain these optimization strategies effectively.

By implementing these strategies, you can significantly enhance the speed, efficiency, and reliability of your CI/CD pipeline, ultimately leading to smoother software development and delivery processes. These are some of the best practices at a high level, and they are not exhaustive, but they are good enough so that you can start optimizing your CI environment.

Summary

This chapter covered CI, and you understood the need for CI and the basic CI workflow for a container application. We then looked at GitHub Actions, which we can use to build an effective CI pipeline. Next, we looked at the Jenkins open source offering and deployed a scalable Jenkins on Kubernetes with Kaniko, setting up a Jenkins controller-agent model. We then understood how to use hooks for automating builds, both in the GitHub Actions- based workflow and the Jenkins-based workflow. Finally, we learned about build performance best practices and dos and don’ts.

By now, you should be familiar with CI and its nuances, along with the various tooling you can use to implement it.

Always use post-commit triggers – Continuous Integration with GitHub Actions and Jenkins

Post-commit triggers help your team significantly. They will not have to log in to the CI server and trigger the build manually. That completely decouples your development team from CI management.

Configure build reporting

You don’t want your development team to log in to the CI tool and check how the build runs. Instead, all they want to know is the result of the build and the build logs. Therefore, you can configure build reporting to send your build status via email or, even better, using a Slack channel.

Customize the build server size

Not all builds work the same in similar kinds of build machines. You may want to choose machines based on what suits your build environment best. If your builds tend to consume more CPU than memory, it will make sense to choose such machines to run your builds instead of the standard ones.

Ensure that your builds only contain what you need

Builds move across networks. You download base images, build your application image, and push that to the container registry. Bloated images not only take a lot of network bandwidth and time to transmit but also make your build vulnerable to security issues. Therefore, it is always best practice to only include what you require in the build and avoid bloat. You can use Docker’s multi-stage builds for these kinds of situations.

Parallelize your builds

Run tests and build processes concurrently to reduce overall execution time. Leverage distributed systems or cloud-based CI/CD platforms for scalable parallelization, allowing you to handle larger workloads efficiently.

Make use of caching

Cache dependencies and build artifacts to prevent redundant downloads and builds, saving valuable time. Implement caching mechanisms such as Docker layer caching or use your package manager’s built-in caches to minimize data transfer and build steps.

Use incremental building

Configure your CI/CD pipeline to perform incremental builds, rebuilding only what has changed since the last build. Maintain robust version control practices to accurately track and identify changes.

Optimize testing

Prioritize and optimize tests by running quicker unit tests before slower integration or end-to-end tests.

Use testing frameworks such as TestNG, JUnit, or PyTest to categorize and parallelize tests effectively.

Use artifact management

Efficiently store and manage build artifacts, preferably in a dedicated artifact repository such as Artifactory or Nexus. Implement artifact versioning and retention policies to maintain a clean artifact repository.

Manage application dependencies

Keep a clean and minimal set of dependencies to reduce build and test times. Regularly update dependencies to benefit from performance improvements and security updates.

Utilize Infrastructure as Code

Utilize Infrastructure as Code (IaC) to provision and configure build and test environments consistently.

Optimize IaC templates to minimize resource utilization, ensuring efficient resource allocation.

Use containerization to manage build and test environments

Containerize applications and utilize container orchestration tools such as Kubernetes to manage test environments efficiently. Leverage container caching to accelerate image builds and enhance resource utilization.

Automating a build with triggers – Continuous Integration with GitHub Actions and Jenkins

The best way to allow your CI build to trigger when you make changes to your code is to use a post-commit webhook. We looked at such an example in the GitHub Actions workflow. Let’s try to automate the build with triggers in the case of Jenkins. We’ll have to make some changes on both the Jenkins and the GitHub sides to do so. We’ll deal with Jenkins first; then, we’ll configure GitHub.

Go to Job configuration | Build Triggers and make the following changes:

Figure 11.16 – Jenkins GitHub hook trigger

Save the configuration by clicking Save. Now, go to your GitHub repository, click Settings | Webhooks | Add Webhook, and add the following details. Then, click Add Webhook:

Figure 11.17 – GitHub webhook

Now, push a change to the repository. The job on Jenkins will start building:

Figure 11.18 – Jenkins GitHub webhook trigger

This isautomated build triggers in action. Jenkins is one of the most popular open source CI tools on the market. The most significant advantage of it is that you can pretty much run it anywhere. However, it does come with some management overhead. You may have noticed how simple it was to start with GitHub Actions, but Jenkins is slightly more complicated.

Several other SaaS platforms offer CI and CD as a service. For instance, if you are running on AWS, you’d get their inbuilt CI with AWS Code Commit and Code Build; Azure provides an entire suite of services for CI and CD in their Azure DevOps offering; and GCP provides Cloud Build for that job.

CI follows the same principle, regardless of the tooling you choose to implement. It is more of a process and a cultural change within your organization. Now, let’s look at some of the best practices regarding CI.

Building performance best practices

CI is an ongoing process, so you will have a lot of parallel builds running within your environment at a given time. In such situations, we can optimize them using several best practices.

Aim for faster builds

The faster you can complete your build, the quicker you will get feedback and run your next iteration. A slow build slows down your development team. Take steps to ensure that builds are faster. For example, in Docker’s case, it makes sense to use smaller base images as it will download the code from the image registry every time it does a build. Using a single base image for most builds will also speed up your build time. Using tests will help, but make sure that they aren’t long-running. We want to avoid a CI build that runs for hours. Therefore, it would be good to offload long-running tests into another job or use a pipeline. Run activities in parallel if possible.

Running our first Jenkins job – Continuous Integration with GitHub Actions and Jenkins

Before we create our first job, we’ll have to prepare our repository to run the job. We will reuse the mdo-posts repository for this. We will copy a build.sh file to the repository, which will build the container image for the posts microservice and push it to Docker Hub.

The build.sh script takes IMAGE_ID and IMAGE_TAG as arguments. It passes them to the Kaniko executor script, which builds the container image using the Dockerfile and pushes it to Docker Hub using the following code:

IMAGE_ID=$1 && \
IMAGE_TAG=$2 && \
export DOCKER_CONFIG=/kaniko/.dockerconfig && \
/kaniko/executor \
–context $(pwd) \
–dockerfile $(pwd)/Dockerfile \
–destination $IMAGE_ID:$IMAGE_TAG \
–force

We will need to copy this file to our local repository using the following commands:

$ cp ~/modern-devops/ch11/jenkins/jenkins-agent/build.sh ~/mdo-posts/

Once you’ve done this, cd into your local repository – that is, ~/mdo-posts – and commit and push your changes to GitHub. Once you’ve done this, you’ll be ready to create a job in Jenkins.

To create a new job in Jenkins, go to the Jenkins home page and select New Item | Freestyle Job.

Provide a job name (preferably the same as the Git repository name), then click Next.

Click on Source Code Management, select Git, and add your Git repository URL, as shown in the following example. Specify the branch from where you want to build:

Figure 11.11 – Jenkins Souce Code Management configuration

Go to Build Triggers, select Poll SCM, and add the following details:

Figure 11.12 – Jenkins – Build Triggers configuration

Then, click on Build | Add Build Step | Execute shell. The Execute shell build step executes a sequence of shell commands on the Linux CLI. In this example, we’re running the build.sh script with the <your_dockerhub_user>/<image> argument and the image tag. Change the details according to your requirements. Once you’ve finished, click Save:

Figure 11.13 – Jenkins – Execute shell configuration

Now, we’re ready to build this job. To do so, you can either go to your job configuration and click Build Now or push a change to GitHub. You should see something like the following:

Figure 11.14 – Jenkins job page

Jenkins will successfully create an agent pod in Kubernetes, where it will run this job, and soon, the job will start building. Click Build | Console Output. If everything is OK, you’ll see that the build was successful and that Jenkins has built the posts service and executed a unit test before pushing the Docker image to the registry:

Figure 11.15 – Jenkins console output

With that, we’re able to run a Docker build using a scalable Jenkins server. As we can see, we’ve set up polling on the SCM settings to look for changes every minute and build the job if we detect any. However, this is resource-intensive and does not help in the long run. Just imagine that you have hundreds of jobs interacting with multiple GitHub repositories, and the Jenkins controller is polling them every minute. A better approach would be if GitHub could trigger a post-commit webhook on Jenkins. Here, Jenkins can build the job whenever there are changes in the repository. We’ll look at that scenario in the next section.