Creating the required infrastructure with Terraform – Immutable Infrastructure with Packer-2
Now, we will define the VM scale set within the resource group using the custom image and the load balancer we defined before:
resource “azurerm_virtual_machine_scale_set” “main” {
name = “webscaleset”
location = var.location
resource_group_name = azurerm_resource_group.main.name upgrade_policy_mode = “Manual” sku {
name = “Standard_DS1_v2”
tier = “Standard”
capacity = 2
}
storage_profile_image_reference {
id=data.azurerm_image.websig.id
}
We then go ahead and define the OS disk and the data disk:
storage_profile_os_disk {
name = “”
caching = “ReadWrite”
create_option = “FromImage”
managed_disk_type = “Standard_LRS”
}
storage_profile_data_disk {
lun = 0
caching = “ReadWrite”
create_option = “Empty”
disk_size_gb = 10
}
The OS profile defines how we log in to the VM:
os_profile {
computer_name_prefix = “web”
admin_username
admin_password
= var.admin_username
= var.admin_password
}
os_profile_linux_config {
disable_password_authentication = false
}
We then define a network profile that will associate the scale set with the load balancer we defined before:
network_profile {
name = “webnp”
primary = true
ip_configuration {
name = “IPConfiguration”
subnet_id = azurerm_subnet.main.id
load_balancer_backend_address_pool_ids = [azurerm_lb_backend_address_pool.bpepool.
id]
primary = true
}
}
tags = {}
}
Now, moving on to the database configuration, we will start by defining a network security group for the database servers to allow ports 22 and 3306 from internal servers within the virtual network:
resource “azurerm_network_security_group” “db_nsg” {
name = “db-nsg”
location = var.location
resource_group_name = azurerm_resource_group.main.name
security_rule {
name = “SSH”
priority = 1001
direction = “Inbound”
access = “Allow”
protocol = “Tcp”
source_port_range = “” destination_port_range = “22” source_address_prefix = ““
destination_address_prefix = “” } security_rule { name = “SQL” priority = 1002 direction = “Inbound” access = “Allow” protocol = “Tcp” source_port_range = ““
destination_port_range = “3306”
source_address_prefix = “” destination_address_prefix = ““
}
tags = {}
}
We then define a NIC to provide an internal IP to the VM:
resource “azurerm_network_interface” “db” {
name = “db-nic”
location = var.location
resource_group_name = azurerm_resource_group.main.name ip_configuration {
name
subnet_id
= “db-ipconfiguration”
= azurerm_subnet.main.id
330
private_ip_address_allocation = “Dynamic”
}
}
We will then associate the network security group to the network interface:
resource “azurerm_network_interface_security_group_association” “db” {
network_interface_id = azurerm_network_interface.db.id
network_security_group_id = azurerm_network_security_group.db_nsg.id
}
Finally, we’ll define the database VM using the custom image:
resource “azurerm_virtual_machine” “db” {
name = “db”
location = var.location
resource_group_name = azurerm_resource_group.main.name
network_interface_ids = [azurerm_network_interface.db.id]
vm_size = var.vm_size
delete_os_disk_on_termination = true
storage_image_reference {
id = data.azurerm_image.dbsig.id
}
storage_os_disk {
name = “db-osdisk”
caching = “ReadWrite”
create_option = “FromImage”
managed_disk_type = “Standard_LRS”
}
os_profile {
computer_name = “db”
admin_username = var.admin_username
admin_password = var.admin_password
}
os_profile_linux_config {
disable_password_authentication = false
}
tags = {}
}
Now, as we’ve defined everything we needed, fill the terraform.tfvars file with the required information, and go ahead and initialize our Terraform workspace by using the following command:
$ terraform init
As Terraform has initialized successfully, use the following command to apply the Terraform configuration:
$ terraform apply
Apply complete! Resources: 13 added, 0 changed, 0 destroyed.
Outputs:
web_ip_addr = “40.115.61.69”
As Terraform has applied the configuration and provided the load balancer IP address as an output, let’s use that to navigate to the web server:
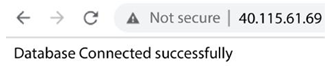
Figure 10.4 – LAMP stack working correctly
As we get the Database Connected successfully message, we see that the configuration is successful! We’ve successfully created a scalable LAMP stack using Packer, Ansible, and Terraform. It combines IaC, configuration as code, immutable infrastructure, and modern DevOps practices to create a seamless environment without manual intervention.
Summary
In this chapter, we have covered immutable infrastructure with Packer. We used Packer with the Ansible provisioner to build custom images for Apache and MySQL. We used the custom images to create a scalable LAMP stack using Terraform. The chapter introduced you to the era of modern DevOps, where everything is automated. We follow the same principles for building and deploying all kinds of infrastructure, be it containers or VMs. In the next chapter, we will discuss one of the most important topics of DevOps – continuous integration.