Search for:
The Blog App and its deployment configuration – Continuous Deployment/ Delivery with Argo CD

Since we discussed the Blog App in the last chapter, let’s look at the services and their interactions again:

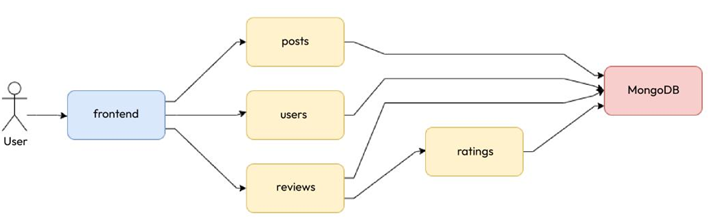
Figure 12.5 – The Blog App and its services and interactions

So far, we’ve created CI pipelines for building, testing, and pushing our Blog App microservice containers. These microservices need to run somewhere. So, we need an environment for this. We will deploy the application in a GKE cluster; for that, we will need a Kubernetes YAML manifest. We built the container for the posts microservice as an example in the previous chapter, and I also left building the rest of the services as an exercise for you. Assuming you’ve built them, we will need the following resources for the application to run seamlessly:

  • MongoDB: We will deploy an auth-enabled MongoDB database with root credentials. The credentials will be injected via environment variables sourced from a Kubernetes Secret resource. We also need to persist our database data, so for that, we need a PersistentVolume mounted to the container, which we will provision dynamically using a PersistentVolumeClaim. As the container is stateful, we will use a StatefulSet to manage it and, therefore, a headless Service to expose the database.
  • Posts, reviews, ratings, and users: The posts, reviews, ratings, and users microservices will interact with MongoDB through the root credentials injected via environment variables sourced from the same Secret as MongoDB. We will deploy them using their respective Deployment resources and expose all of them via individual ClusterIP Services.
  • Frontend: The frontend microservice does not need to interact with MongoDB, so there will be no interaction with the Secret resource. We will also deploy this service using a Deployment resource. As we want to expose the service on the internet, we will create a LoadBalancer Service for it.

We can summarize these aspects with the following diagram:

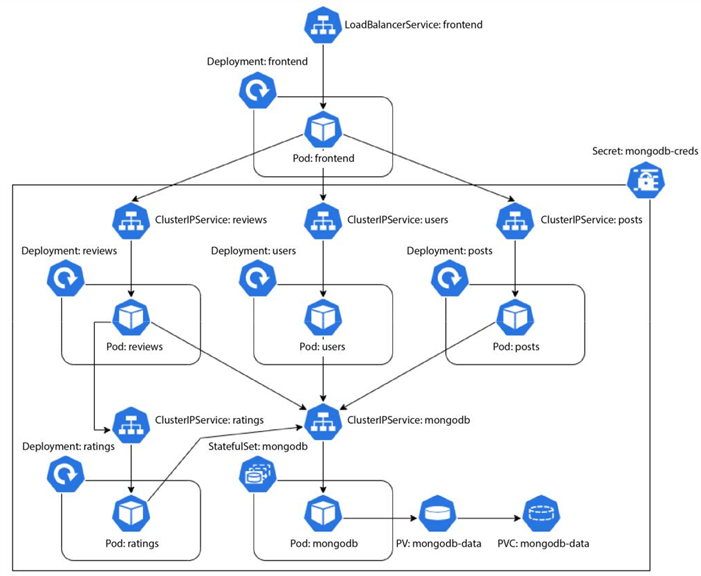
Figure 12.6 – The Blog App – Kubernetes resources and interactions

Now, as we’re following the GitOps model, we need to store the manifests of all the resources on Git. However, since Kubernetes Secrets are not inherently secure, we cannot store their manifests directly on Git. Instead, we will use another resource called SealedSecrets to manage this securely.

In Chapter 2, Source Code Management with Git and GitOps, we discussed application and environment repositories forming the fundamental building blocks of GitOps-based CI and CD, respectively. In the previous chapter, we created an application repository on GitHub and used GitHub Actions (and Jenkins) to build, test, and push our application container to Docker Hub. As CD focuses on the Ops part of DevOps, we will need an Environment repository to implement it, so let’s go ahead and create our Environment repository in the next section.

Complex deployment models – Continuous Deployment/ Delivery with Argo CD

Complex deployment models, unlike simple deployment models, try to minimize disruptions and downtimes within the application and make rolling out releases more seamless to the extent that most users don’t even notice when the upgrade is being conducted. Two main kinds of complex deployments are prevalent in the industry; let’s take a look.

Blue/Green deployments

Blue/Green deployments (also known as Red/Black deployments) roll out the new version (Green) in addition to the existing version (Blue). You can then do sanity checks and other activities with the latest version to ensure that everything is good to go. Then, you can switch traffic from the old to the new version and monitor for any issues. If you encounter problems, you switch back traffic to the old version. Otherwise, you keep the latest version running and remove the old version:

Figure 12.3 – Blue/Green deployments

You can take Blue/Green deployments to the next level using canary deployments.

Canary deployments and A/B testing

Canary deployments are similar to Blue/Green deployments but are generally utilized for risky upgrades. So, like Blue/Green deployments, we deploy the new version alongside the existing one. Instead of switching all traffic to the latest version at once, we only switch traffic to a small subset of users. As we do that, we can understand from our logs and user behaviors whether the switchover is causing any issues. This is calledA/B testing. When we do A/B testing, we can target a specific group of users based on location, language, age group, or users who have opted to test Beta versions of a product. That will help organizations gather feedback without disrupting general users and make changes to the product once they’re satisfied with what they are rolling out. You can make the release generally available by switching over the total traffic to the new version and getting rid of the old version:

Figure 12.4 – Canary deployments

While complex deployments cause the least disruption to users, they are generally complex to manage using traditional CI tools such as Jenkins. Therefore, we need to get the tooling right on it. Several CD tools are available in the market, including Argo CD, Spinnaker, Circle CI, and AWS Code Deploy. As this entire book is focused on GitOps, and Argo CD is a GitOps native tool, for this chapter, we will focus on Argo CD. Before we delve into deploying the application, let’s revisit what we want to deploy.

Utilize cloud-based CI/CD – Continuous Integration with GitHub Actions and Jenkins

Consider adopting cloud -based CI/CD services such as AWS CodePipeline, Google Cloud Build, Azure DevOps, or Travis CI for enhanced scalability and performance. Harness on-demand cloud resources to expand parallelization capabilities and adapt to varying workloads.

Monitor and profile your CI/CD pipelines

Implement performance monitoring and profiling tools to identify bottlenecks and areas for improvement within your CI/CD pipeline. Regularly analyze build and test logs to gather insights for optimizing performance.

Pipeline optimization

Continuously review and optimize your CI/CD pipeline configuration for efficiency and relevance.

Remove unnecessary steps or stages that do not contribute significantly to the process.

Implement automated cleanup

Implement automated cleanup routines to remove stale artifacts, containers, and virtual machines, preventing resource clutter. Regularly purge old build artifacts and unused resources to maintain a tidy environment.

Documentation and training

Document best practices and performance guidelines for your CI/CD processes, ensuring that the entire team follows these standards consistently. Provide training and guidance to team members to empower them to implement and maintain these optimization strategies effectively.

By implementing these strategies, you can significantly enhance the speed, efficiency, and reliability of your CI/CD pipeline, ultimately leading to smoother software development and delivery processes. These are some of the best practices at a high level, and they are not exhaustive, but they are good enough so that you can start optimizing your CI environment.

Summary

This chapter covered CI, and you understood the need for CI and the basic CI workflow for a container application. We then looked at GitHub Actions, which we can use to build an effective CI pipeline. Next, we looked at the Jenkins open source offering and deployed a scalable Jenkins on Kubernetes with Kaniko, setting up a Jenkins controller-agent model. We then understood how to use hooks for automating builds, both in the GitHub Actions- based workflow and the Jenkins-based workflow. Finally, we learned about build performance best practices and dos and don’ts.

By now, you should be familiar with CI and its nuances, along with the various tooling you can use to implement it.

Always use post-commit triggers – Continuous Integration with GitHub Actions and Jenkins

Post-commit triggers help your team significantly. They will not have to log in to the CI server and trigger the build manually. That completely decouples your development team from CI management.

Configure build reporting

You don’t want your development team to log in to the CI tool and check how the build runs. Instead, all they want to know is the result of the build and the build logs. Therefore, you can configure build reporting to send your build status via email or, even better, using a Slack channel.

Customize the build server size

Not all builds work the same in similar kinds of build machines. You may want to choose machines based on what suits your build environment best. If your builds tend to consume more CPU than memory, it will make sense to choose such machines to run your builds instead of the standard ones.

Ensure that your builds only contain what you need

Builds move across networks. You download base images, build your application image, and push that to the container registry. Bloated images not only take a lot of network bandwidth and time to transmit but also make your build vulnerable to security issues. Therefore, it is always best practice to only include what you require in the build and avoid bloat. You can use Docker’s multi-stage builds for these kinds of situations.

Parallelize your builds

Run tests and build processes concurrently to reduce overall execution time. Leverage distributed systems or cloud-based CI/CD platforms for scalable parallelization, allowing you to handle larger workloads efficiently.

Make use of caching

Cache dependencies and build artifacts to prevent redundant downloads and builds, saving valuable time. Implement caching mechanisms such as Docker layer caching or use your package manager’s built-in caches to minimize data transfer and build steps.

Use incremental building

Configure your CI/CD pipeline to perform incremental builds, rebuilding only what has changed since the last build. Maintain robust version control practices to accurately track and identify changes.

Optimize testing

Prioritize and optimize tests by running quicker unit tests before slower integration or end-to-end tests.

Use testing frameworks such as TestNG, JUnit, or PyTest to categorize and parallelize tests effectively.

Use artifact management

Efficiently store and manage build artifacts, preferably in a dedicated artifact repository such as Artifactory or Nexus. Implement artifact versioning and retention policies to maintain a clean artifact repository.

Manage application dependencies

Keep a clean and minimal set of dependencies to reduce build and test times. Regularly update dependencies to benefit from performance improvements and security updates.

Utilize Infrastructure as Code

Utilize Infrastructure as Code (IaC) to provision and configure build and test environments consistently.

Optimize IaC templates to minimize resource utilization, ensuring efficient resource allocation.

Use containerization to manage build and test environments

Containerize applications and utilize container orchestration tools such as Kubernetes to manage test environments efficiently. Leverage container caching to accelerate image builds and enhance resource utilization.

Running our first Jenkins job – Continuous Integration with GitHub Actions and Jenkins

Before we create our first job, we’ll have to prepare our repository to run the job. We will reuse the mdo-posts repository for this. We will copy a build.sh file to the repository, which will build the container image for the posts microservice and push it to Docker Hub.

The build.sh script takes IMAGE_ID and IMAGE_TAG as arguments. It passes them to the Kaniko executor script, which builds the container image using the Dockerfile and pushes it to Docker Hub using the following code:

IMAGE_ID=$1 && \
IMAGE_TAG=$2 && \
export DOCKER_CONFIG=/kaniko/.dockerconfig && \
/kaniko/executor \
–context $(pwd) \
–dockerfile $(pwd)/Dockerfile \
–destination $IMAGE_ID:$IMAGE_TAG \
–force

We will need to copy this file to our local repository using the following commands:

$ cp ~/modern-devops/ch11/jenkins/jenkins-agent/build.sh ~/mdo-posts/

Once you’ve done this, cd into your local repository – that is, ~/mdo-posts – and commit and push your changes to GitHub. Once you’ve done this, you’ll be ready to create a job in Jenkins.

To create a new job in Jenkins, go to the Jenkins home page and select New Item | Freestyle Job.

Provide a job name (preferably the same as the Git repository name), then click Next.

Click on Source Code Management, select Git, and add your Git repository URL, as shown in the following example. Specify the branch from where you want to build:

Figure 11.11 – Jenkins Souce Code Management configuration

Go to Build Triggers, select Poll SCM, and add the following details:

Figure 11.12 – Jenkins – Build Triggers configuration

Then, click on Build | Add Build Step | Execute shell. The Execute shell build step executes a sequence of shell commands on the Linux CLI. In this example, we’re running the build.sh script with the <your_dockerhub_user>/<image> argument and the image tag. Change the details according to your requirements. Once you’ve finished, click Save:

Figure 11.13 – Jenkins – Execute shell configuration

Now, we’re ready to build this job. To do so, you can either go to your job configuration and click Build Now or push a change to GitHub. You should see something like the following:

Figure 11.14 – Jenkins job page

Jenkins will successfully create an agent pod in Kubernetes, where it will run this job, and soon, the job will start building. Click Build | Console Output. If everything is OK, you’ll see that the build was successful and that Jenkins has built the posts service and executed a unit test before pushing the Docker image to the registry:

Figure 11.15 – Jenkins console output

With that, we’re able to run a Docker build using a scalable Jenkins server. As we can see, we’ve set up polling on the SCM settings to look for changes every minute and build the job if we detect any. However, this is resource-intensive and does not help in the long run. Just imagine that you have hundreds of jobs interacting with multiple GitHub repositories, and the Jenkins controller is polling them every minute. A better approach would be if GitHub could trigger a post-commit webhook on Jenkins. Here, Jenkins can build the job whenever there are changes in the repository. We’ll look at that scenario in the next section.

Installing Jenkins – Continuous Integration with GitHub Actions and Jenkins-2

The next step involves creating a PersistentVolumeClaim resource to store Jenkins data to ensure that the Jenkins data persists beyond the pod’s life cycle and will exist even when we delete the pod.

To apply the manifest, run the following command:
$ kubectl apply -f jenkins-pvc.yaml

Then, we will create a Kubernetes Secret called regcred to help the Jenkins pod authenticate with the Docker registry. Use the following command to do so:
$ kubectl create secret docker-registry regcred –docker-username= \ –docker-password= –docker-server=https://index.docker.io/v1/

Now, we’ll define a Deployment resource, jenkins-deployment.yaml, that will run the Jenkins container. The pod uses the jenkins service account and defines a PersistentVolume resource called jenkins-pv-storage using the PersistentVolumeClaim resource called jenkins-pv-claim that we defined. We define the Jenkins container that uses the Jenkins controller image we created. It exposes HTTP port 8080 for the Web UI, and port 50000 for JNLP, which the agents would use to interact with the Jenkins controller. We will also mount the jenkins-pv-storage volume to /var/jenkins_home to persist the Jenkins data beyond the pod’s life cycle. We specify regcred as the imagePullSecret attribute in the pod image. We also use initContainer to assign ownership to jenkins for /var/jenkins_home.

As the file contains placeholders, replace with your Docker Hub user and with a Jenkins admin password of your choice using the following commands:
$ sed -i ‘s//actual_dockerhub_user/g’ jenkins-deployment.yaml

Apply the manifest using the following command:
$ kubectl apply -f jenkins-deployment.yaml

As we’ve created the deployment, we can expose the deployment on a LoadBalancer Service using the jenkins-svc.yaml manifest. This service exposes ports8080 and 50000 on a load balancer. Use the following command to apply the manifest:
$ kubectl apply -f jenkins-svc.yaml

Let’s get the service to find the external IP to use that to access Jenkins:
$ kubectl get svc jenkins-service

NAME EXTERNAL-IP PORT(S) jenkins-service LOAD_BALANCER_EXTERNAL_IP 8080,50000

Now, to access the service, go to http://:8080 in your browser window:

Figure 11.9 – Jenkins login page

As we can see, we’re greeted with a login page. This means Global Security is working correctly. Let’s log in using the admin username and password we set:

Figure 11.10 – Jenkins home page

As we can see, we’ve successfully logged in to Jenkins. Now, let’s go ahead and create our first Jenkins job.

Installing Jenkins – Continuous Integration with GitHub Actions and Jenkins-1

As we’re running on a Kubernetes cluster, we only need the latest official Jenkins image from Docker Hub. We will customize the image according to our requirements.

The following Dockerfile file will help us create the image with the required plugins and the initial configuration:
FROM jenkins/jenkins
ENV CASC_JENKINS_CONFIG /usr/local/casc.yaml
ENV JAVA_OPTS -Djenkins.install.runSetupWizard=false
COPY casc.yaml /usr/local/casc.yaml
COPY plugins.txt /usr/share/jenkins/ref/plugins.txt
RUN jenkins-plugin-cli –plugin-file /usr/share/jenkins/ref/plugins.txt

The Dockerfile starts from the Jenkins base image. Then, we declare two environment variables – CASC_JENKINS_CONFIG, which points to the casc.yaml file we defined in the previous section, and JAVA_OPTS, which tells Jenkins not to run the setup wizard. Then, we copy the casc.yaml and plugins.txt files to their respective directories within the Jenkins container. Finally, we run jenkins-plugins-cli on the plugins.txt file, which installs the required plugins.

The plugins.txt file contains a list of all Jenkins plugins that we will need in this setup.

Tip

You can customize and install more plugins for the controller image based on your requirements by updating the plugins.txt file.

Let’s build the image from the Dockerfile file using the following command:
$ docker build -t /jenkins-controller-kaniko .

Now that we’ve built the image, use the following command to log in and push the image to Docker Hub:
$ docker login
$ docker push /jenkins-controller-kaniko

We must also build the Jenkins agent image to run our builds. Remember that Jenkins agents need all the supporting tools you need to run your builds. You can find the resources for the agents in the following directory:
$ cd ~/modern-devops/ch11/jenkins/jenkins-agent

We will use the following Dockerfile to do that:
FROM gcr.io/kaniko-project/executor:v1.13.0 as kaniko
FROM jenkins/inbound-agent
COPY –from=kaniko /kaniko /kaniko
WORKDIR /kaniko
USER root

ThisDockerfile uses a multi-stage build to take the kaniko base image and copy the kaniko binary from the kaniko base image to the inbound-agent base image. Let’s go ahead and build and push the container using the following commands:
$ docker build -t /jenkins-jnlp-kaniko .
$ docker push /jenkins-jnlp-kaniko

To deploy Jenkins on our Kubernetes cluster, we will first create a jenkins service account. A Kubernetes service account resource helps pods authenticate with the Kubernetes API server. We will give the service account permission to interact with the Kubernetes API server as cluster-admin using a cluster role binding. A Kubernetes ClusterRoleBinding resource helps provide permissions to a service account to perform certain actions in the Kubernetes cluster. The jenkins-sa-crb. yaml manifest describes this. To access these resources, run the following command:
$ cd ~/modern-devops/ch11/jenkins/jenkins-controller

To apply the manifest, run the following command:
$ kubectl apply -f jenkins-sa-crb.yaml

Scalable Jenkins on Kubernetes with Kaniko – Continuous Integration with GitHub Actions and Jenkins-1

Imagine you’re running a workshop where you build all sorts of machines. In this workshop, you have a magical conveyor belt called Jenkins for assembling these machines. But to make your workshop even more efficient and adaptable, you’ve got a team of tiny robot workers called Kaniko that assist in constructing the individual parts of each machine. Let’s draw parallels between this workshop analogy and the technology world:

  • Scalable Jenkins: Jenkins is a widely used automation server that helps automate various tasks, particularly those related to building, testing, and deploying software. “Scalable Jenkins” means configuring Jenkins in a way that allows it to efficiently handle a growing workload, much like having a spacious workshop capable of producing numerous machines.
  • Kubernetes: Think of Kubernetesas the workshop manager. It’s an orchestration platform that automates the process of deploying, scaling, and managing containerized applications. Kubernetes ensures that Jenkins and the team of tiny robots (Kaniko) work seamlessly together and can adapt to changing demands.
  • Kaniko: Kaniko is equivalent to your team of miniature robot workers. In the context of containerization, Kaniko is a tool that aids in building container images, which are akin to the individual parts of your machines. What makes Kaniko special is that it can do this without needing elevated access to the Docker daemon. Unlike traditional container builders, Kaniko doesn’t require special privileges, making it a more secure choice for constructing containers, especially within a Kubernetes environment.

Now, let’s combine the three tools and see what we can achieve:

  • Building containers at scale: Your workshop can manufacture multiple machines simultaneously, thanks to Jenkins and the tiny robots. Similarly, with Jenkins on Kubernetes using Kaniko, you can efficiently and concurrently create container images. This ability to scale is crucial in modern application development, where containerization plays a pivotal role.
  • Isolation and security: Just as Kaniko’s tiny robots operate within a controlled environment, Kaniko ensures that container image building takes place in an isolated and secure manner within a Kubernetes cluster. This means that different teams or projects can use Jenkins and Kaniko without interfering with each other’s container-building processes.
  • Consistency and automation: Similar to how the conveyor belt (Jenkins) guarantees consistent machine assembly, Jenkins on Kubernetes with Kaniko ensures uniform container image construction. Automation is at the heart of this setup, simplifying the process of building and managing container images for applications.

To summarize, scalable Jenkins on Kubernetes with Kaniko refers to the practice of setting up Jenkins to efficiently build and manage container images using Kaniko within a Kubernetes environment. It enables consistent, parallel, and secure construction of container images, aligning perfectly with modern software development workflows.

So, the analogy of a workshop with Jenkins, Kubernetes, and Kaniko vividly illustrates how this setup streamlines container image building, making it scalable, efficient, and secure for contemporary software development practices. Now, let’s dive deeper into Jenkins.

Jenkins is the most popular CI tool available in the market. It is open source, simple to install, and runs with ease. It is a Java -based tool with a plugin-based architecture designed to support several integrations, such as with a source code management tool such as Git, SVN, and Mercurial, or with popular artifact repositories such as Nexus and Artifactory. It also integrates well with well-known build tools such as Ant, Maven, and Gradle, aside from the standard shell scripting and Windows batch file executions.

Creating a GitHub repository – Continuous Integration with GitHub Actions and Jenkins-1

Before we can use GitHub Actions, we need to create a GitHub repository. As we know that each microservice can be independently developed, we will place all of them in separate Git repositories. For this exercise, we will focus only on the posts microservice and leave the rest to you as an exercise.

To do so, go to https://github.com/new and create a new repository. Give it an appropriate name. For this exercise, I am going to use mdo-posts.

Once you’ve created it, clone the repository by using the following command:

$ git clone https://github.com/<GitHub_Username>/mdo-posts.git

Then, change the directory into the repository directory and copy the app.py, app.test. py, requirements.txt, and Dockerfile files into the repository’s directory using the following commands:

$ cd mdo-posts

$ cp ~/modern-devops/blog-app/posts/* .

Now, we need to create a GitHub Actions workflow file. We’ll do this in the next section.

Creating a GitHub Actions workflow

A GitHub Actions workflow is a simple YAML file that contains the build steps. We must create this workflow in the .github/workflows directory within the repository. We can do this using the following command:

$ mkdir -p .github/workflows

We will use the following GitHub Actions workflow file, build.yaml, for this exercise:

name: Build and Test App
on:
push:
branches: [ main ]
pull_request:
branches: [ main ]
jobs:
build:
runs-on: ubuntu-latest
steps:
uses: actions/checkout@v2
name: Login to Docker Hub
id: login
run: docker login -u ${{ secrets.DOCKER_USER  }} -p ${{ secrets.DOCKER_PASSWORD }}
name: Build the Docker image
id: build
run: docker build . –file Dockerfile –tag ${{ secrets.DOCKER_USER  }}/
mdo-posts:$(git rev-parse –short “$GITHUB_SHA”)

  • name: Push the Docker image
    id: push
    run: docker push ${{ secrets.DOCKER_USER }}/mdo-posts:$(git rev-parse –short “$GITHUB_SHA”)

This file comprisesthe following:

•    name: The workflow’s name – Build and Test App in this case.

  • on: This describes when this workflow will run. In this case, it will run if apush or pull request is sent on the main branch.
  • jobs: A GitHub Actions workflow contains one or more jobs that run in parallel by default. This attribute includes all jobs.
  • jobs.build: This is a job that does the container build.
  • jobs.build.runs-on: This describes where the build job will run. We’ve specified ubuntu-latest here. This means that this job will run on an Ubuntu VM.
  • jobs.build.steps: This consists of the steps that run sequentially within the job. The

build job consists of four build steps: checkout, which will check out the code from your repository; login, which will log in to Docker Hub; build, which will run a Docker build on your code; and push, which will push your Docker image to Docker Hub. Note that we tag the image with the Git commit SHA. This relates the build with the commit, making Git the single source of truth.

  • jobs.build.steps.uses: This is the first step and describes an action you will run as a part of your job. Actions are reusable pieces of code that you can execute in your pipeline. In this case, it runs the checkout action. It checks out the code from the current branch where the action is triggered.

Tip

Always use a version with your actions. This will prevent your build from breaking if a later version is incompatible with your pipeline.

  • jobs.build.steps.name: This is thename of your build step.
  • jobs.build.steps.id: This is the unique identifier of your build step.
  • jobs.build.steps.run: This is the command it executes as part of the build step.

The workflow also contains variables within ${{ }} . We can define multiple variables within the workflow and use them in the subsequent steps. In this case, we’ve used two variables – ${{ secrets.DOCKER_USER }} and ${{ secrets.DOCKER_PASSWORD }}. These variables are sourced from GitHub secrets.

Tip

It is best practice to use GitHub secrets to store sensitive information. Never store these details directly in the repository with code.

Building a CI pipeline with GitHub Actions – Continuous Integration with GitHub Actions and Jenkins-2

This directory contains multiple microservices and is structured as follows:
├── frontend
│ ├── Dockerfile
│ ├── app.py
│ ├── app.test.py
│ ├── requirements.txt
│ ├── static
│ └── templates
├── posts
│ ├── Dockerfile
│ ├── app.py
│ ├── app.test.py
│ └── requirements.txt ├── ratings …
├── reviews …
└── users …

The frontend directory contains files for the frontend microservice, and notably, it includes app.py (the Flask application code), app.test.py (the unit tests for the Flask application), requirements.txt (which contains all Python modules required by the app), and Dockerfile. It also includes a few other directories catering to the user interface elements of this app.

The posts, reviews, ratings, and users microservices have the same structure and contain app.py, app.test.py, requirements.txt, and Dockerfile files.

So, let’s start by switching to the posts directory:
$ cd posts

As we know that Docker is inherently CI-compliant, we can run the tests using Dockerfile itself.

Let’s investigate the Dockerfile of the posts service:
FROM python:3.7-alpine
ENV FLASK_APP=app.py
ENV FLASK_RUN_HOST=0.0.0.0
RUN apk add –no-cache gcc musl-dev linux-headers
COPY requirements.txt requirements.txt
RUN pip install -r requirements.txt
EXPOSE 5000
COPY . .
RUN python app.test.py
CMD [“flask”, “run”]

ThisDockerfile starts with the python:3.7-alpine base image, installs the requirements, and copies the code into the working directory. It runs the app.test.py unit test to check whether the code would work if we deploy it. Finally, the CMD command defines a flask run command to run when we launch the container.

Let’s build our Dockerfile and see what we get:
$ docker build –progress=plain -t posts .
4 [1/6] FROM docker.io/library/python:3.7-alpine
5 [internal] load build context
6 [2/6] RUN apk add — no-cache gcc musl-dev linux-headers
7 [3/6] COPY requirements.txt requirements.txt
8 [4/6] RUN pip install -r requirements.txt
9 [5/6] COPY . .
10 [6/6] RUN python app.test.py
10 0.676 ————————————————-
10 0.676 Ran 8 tests in 0.026s
11 exporting to image
11 naming to docker.io/library/posts done

As we can see, it built the container, executed a test on it, and responded with Ran 8 tests in 0.026s and an OK message. Therefore, we could use Dockerfile to build and test this app. We used the –progress=plain argument with the docker build command. This is because we wanted to see the stepwise output of the logs rather than Docker merging progress into a single message (this is now a default behavior).

Now, let’s look at GitHub Actions and how we can automate this step.