Search for:
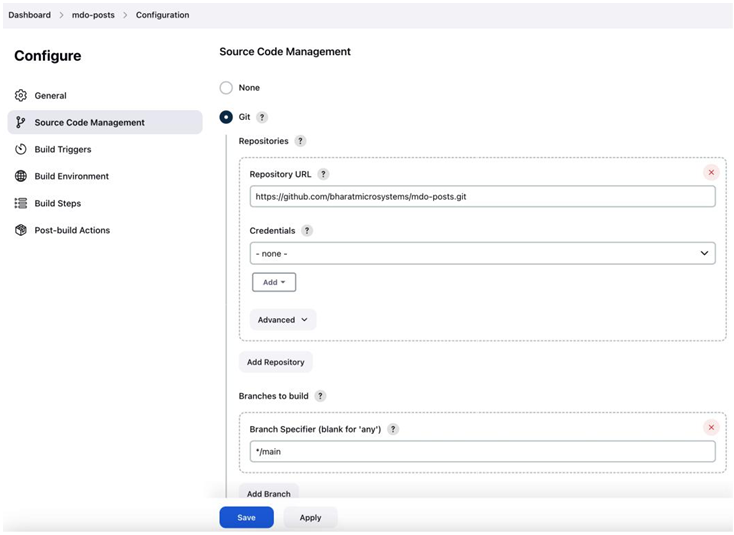
CD models and tools – Continuous Deployment/ Delivery with Argo CD

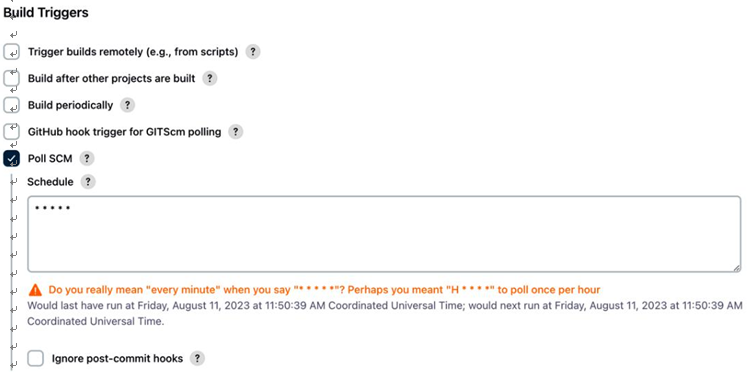
A typical CI/CD workflow looks as described in the following figure and the subsequent steps:

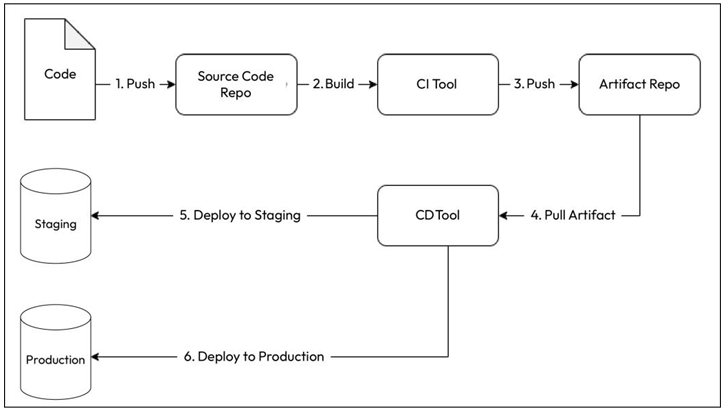
Figure 12.1 – CI/CD workflow

  1. Your developers write code and push it to a code repository (typically a Git repository).
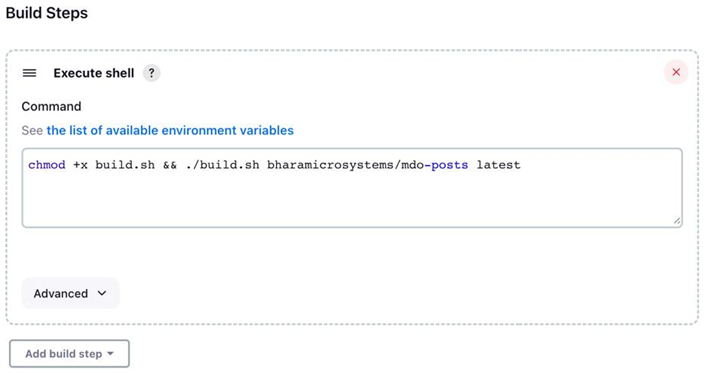
  2. Your CI tool builds the code, runs a series of tests, and pushes the tested build to an artifact repository. Your CD tool then picks up the artifact and deploys it to your test and staging environments. Based on whether you want to do continuous deployment or delivery, it automatically deploys the artifact to the production environment.

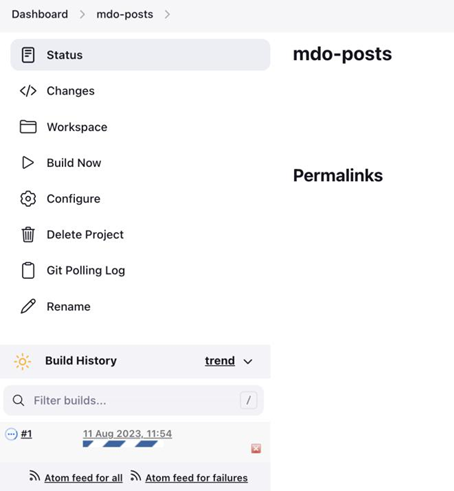
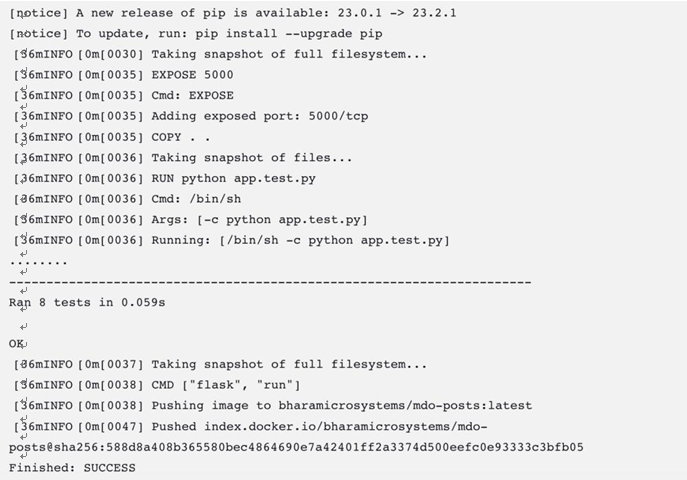
Well, what do you choose for a delivery tool? Let’s look at the example we covered in Chapter 11, Continuous Integration. We picked up the posts microservice app and used a CI tool such as GitHubActions/Jenkins that uses Docker to create a container out of it and push it to our Docker Hub container registry. Well, we could have used the same tool for deploying to our environment.

For example, if we wanted to deploy to Kubernetes, it would have been a simple YAML update and kubectl apply. We could easily do this with any of those tools, but we chose not to do it. Why? The answer is simple – CI tools are meant for CI, and if you want to use them for anything else, you’ll get stuck at a certain point. That does not mean that you cannot use these tools for CD. It will only suit a few use cases based on the deployment model you follow.

Several deployment models exist based on your application, technology stack, customers, risk appetite, and cost consciousness. Let’s look at some of the popular deployment models that are used within the industry.

Simple deployment model

The simple deployment model is one of the most straightforward of all: you deploy the required version of your application after removing the old one. It completely replaces the previous version, and rolling back involves redeploying the older version after removing the deployed one:

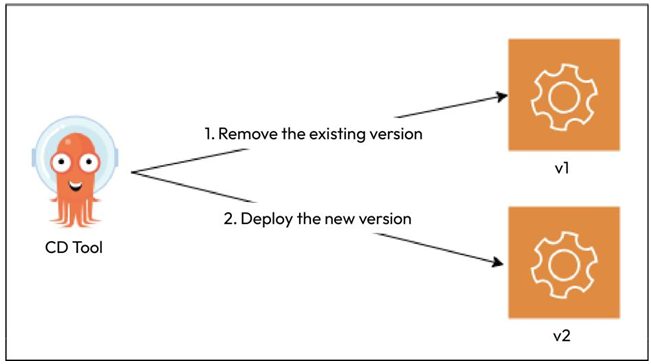
Figure 12.2 – Simple deployment model

As it is a simple way of deploying things, you can manage this using a CI tool such as Jenkins or GitHub Actions. However, the simple deployment model is not the most desired deployment methodbecause of some inherent risks. This kind of change is disruptive andtypically needs downtime. This means your service would remain unavailable to your customers for the upgrade period. It might be OK for organizations that do not have users 24/7, but disruptions eat into the service-level objectives (SLOs) and service-level agreements (SLAs) of global organizations. Even if there isn’t one, they hamper customer experience and the organization’s reputation.

Therefore, to manage such kinds of situations, we have some complex deployment models.

The importance of CD and automation – Continuous Deployment/ Delivery with Argo CD-2

CD offers several advantages. Some of them are as follows:

  • Faster time to market: CD and CI reduce the time it takes to deliver new features, enhancements, and bug fixes to end users. This agility can give your organization a competitive edge by allowing you to respond quickly to market demands.
  • Reduced risk: By automating the deployment process and frequently pushing small code changes, you minimize the risk of large, error-prone deployments. Bugs and issues are more likely to be caught early, and rollbacks can be less complex.
  • Improved code quality: Frequent automated testing and quality checks are an integral part of CD and CI. This results in higher code quality as developers are encouraged to write cleaner, more maintainable code. Any issues are caught and addressed sooner in the development process.
  • Enhanced collaboration: CD and CI encourage collaboration between development and operations teams. It breaks down traditional silos and encourages cross-functional teamwork, leading to better communication and understanding.
  • Efficiency and productivity: Automation of repetitive tasks, such as testing, building, and deployment, frees up developers’ time to focus on more valuable tasks, such as creating new features and improvements.
  • Customer feedback: CD allows you to gather feedback from real users more quickly. By deploying small changes frequently, you can gather user feedback and adjust your development efforts accordingly, ensuring that your product better meets user needs.
  • Continuous improvement: CD promotes a culture of continuous improvement. By analyzing data on deployments and monitoring, teams can identify areas for enhancement and iterate on their processes.
  • Better security: Frequent updates mean that security vulnerabilities can be addressed promptly, reducing the window of opportunity for attackers. Security checks can be automated and integrated into the CI/CD pipeline.
  • Reduced manual intervention: CD minimizes the need for manual intervention in the deployment process. This reduces the potential for human error and streamlines the release process.
  • Scalability: As your product grows and the number of developers and your code base complexity increases, CD can help maintain a manageable development process. It scales effectively by automating many of the release and testing processes.
  • Cost savings: Although implementing CI/CD requires an initial investment in tools and processes, it can lead to cost savings in the long run by reducing the need for extensive manual testing, lowering deployment-related errors, and improving resource utilization.
  • Compliance and auditing: For organizations with regulatory requirements, CD can improve compliance by providing a detailed history of changes and deployments, making it easier to track and audit code changes.

It’s important to note that while CD and CI offer many advantages, they also require careful planning, infrastructure, and cultural changes to be effective.

There are several models and tools available to implement CD. We’ll have a look at some of them in the next section.

The importance of CD and automation – Continuous Deployment/ Delivery with Argo CD-1

CD forms the Ops part of your DevOps toolchain. So, while your developers are continuously building and pushing code and your CI pipeline is building, testing, and publishing the builds to your artifact repository, the Ops team will deploy the build to the test and staging environments. The QA team is the gatekeeper that will ensure that the code meets a certain quality, and only then will the Ops team deploy the code to production.

Now, for organizations implementing only the CI part, the rest of the activities are manual. For example, operators will pull the artifacts and run commands to do the deployments manually. Therefore, your deployment’s velocity will depend on the availability of your Ops team to do it. As the deployments are manual, the process is error-prone, and human beings tend to make mistakes in repeatable jobs.

One of the essential principles of modern DevOps is to avoid toil. Toil is nothing but repeatable jobs that developers and operators do day in and day out, and all of that toil can be removed by automation. This will help your team focus on the more important things at hand.

With continuous delivery, standard tooling can deploy code to higher environments based on certain gate conditions. CD pipelines will trigger when a tested build arrives at the artifact repository or, in the case of GitOps, if any changes are detected in the Environment repository. The pipeline then decides, based on a set configuration, where and how to deploy the code. It also establishes whether manual checks are required, such as raising a change ticket and checking whether it’s approved.

While continuous deployment and delivery are often confused with being the same thing, there is a slight difference between them. Continuous delivery enables your team to deliver tested code in your environment based on a human trigger. So, while you don’t have to do anything more than click a button to do a deployment to production, it would still be initiated by someone at a convenient time (a maintenance window). Continuous deployments go a step further when they integrate with the CI process and will start the deployment process as soon as a new tested build is available for them to consume. There is no need for manual intervention, and continuous deployment will only stop in case of a failed test.

The monitoring tool forms the next part of the DevOps toolchain. The Ops team can learn from managing their production environment and provide developers with feedback regarding what they need to do better. That feedback ends up in the development backlog, and they can deliver it as features in future releases. That completes the cycle, and now you have your team churning out a technology product continuously.

Technical requirements – Continuous Deployment/ Delivery with Argo CD

In the previous chapter, we looked at one of the key aspects of modern DevOps – continuous integration (CI ). CI is the first thing most organizations implement when they embrace DevOps,but things don’t end with CI, which only delivers a tested build in an artifact repository. Instead, we would also want to deploy the artifact to our environments. In this chapter, we’ll implement the next part of the DevOps toolchain – continuous deployment/delivery (CD).

In this chapter, we’re going to cover the following main topics:

  • The importance of CD and automation
  • CD models and tools
  • The Blog App and its deployment configuration
  • Continuous declarative IaC using an Environment repository
  • Introduction to Argo CD
  • Installing and setting up Argo CD
  • Managing sensitive configurations and secrets
  • Deploying the sample Blog App

Technical requirements

In this chapter, we will spin up a cloud-based Kubernetes cluster, Google Kubernetes Engine (GKE), for the exercises. At the time of writing, Google Cloud Platform (GCP) provides a free $300 trial for 90 days, so you can go ahead and sign up for one at https://console.cloud.google.com/.

You will also need to clone the following GitHub repository for some exercises: https://github.

com/PacktPublishing/Modern-DevOps-Practices.

Run the following command to clone the repository into your home directory, and cd into the ch12 directory to access the required resources:

$ git clone https://github.com/PacktPublishing/Modern-DevOps-Practices-2e.git \ modern-devops

$ cd modern-devops/ch12

So, let’s get started!

Running our first Jenkins job – Continuous Integration with GitHub Actions and Jenkins

Before we create our first job, we’ll have to prepare our repository to run the job. We will reuse the mdo-posts repository for this. We will copy a build.sh file to the repository, which will build the container image for the posts microservice and push it to Docker Hub.

The build.sh script takes IMAGE_ID and IMAGE_TAG as arguments. It passes them to the Kaniko executor script, which builds the container image using the Dockerfile and pushes it to Docker Hub using the following code:

IMAGE_ID=$1 && \
IMAGE_TAG=$2 && \
export DOCKER_CONFIG=/kaniko/.dockerconfig && \
/kaniko/executor \
–context $(pwd) \
–dockerfile $(pwd)/Dockerfile \
–destination $IMAGE_ID:$IMAGE_TAG \
–force

We will need to copy this file to our local repository using the following commands:

$ cp ~/modern-devops/ch11/jenkins/jenkins-agent/build.sh ~/mdo-posts/

Once you’ve done this, cd into your local repository – that is, ~/mdo-posts – and commit and push your changes to GitHub. Once you’ve done this, you’ll be ready to create a job in Jenkins.

To create a new job in Jenkins, go to the Jenkins home page and select New Item | Freestyle Job.

Provide a job name (preferably the same as the Git repository name), then click Next.

Click on Source Code Management, select Git, and add your Git repository URL, as shown in the following example. Specify the branch from where you want to build:

Figure 11.11 – Jenkins Souce Code Management configuration

Go to Build Triggers, select Poll SCM, and add the following details:

Figure 11.12 – Jenkins – Build Triggers configuration

Then, click on Build | Add Build Step | Execute shell. The Execute shell build step executes a sequence of shell commands on the Linux CLI. In this example, we’re running the build.sh script with the <your_dockerhub_user>/<image> argument and the image tag. Change the details according to your requirements. Once you’ve finished, click Save:

Figure 11.13 – Jenkins – Execute shell configuration

Now, we’re ready to build this job. To do so, you can either go to your job configuration and click Build Now or push a change to GitHub. You should see something like the following:

Figure 11.14 – Jenkins job page

Jenkins will successfully create an agent pod in Kubernetes, where it will run this job, and soon, the job will start building. Click Build | Console Output. If everything is OK, you’ll see that the build was successful and that Jenkins has built the posts service and executed a unit test before pushing the Docker image to the registry:

Figure 11.15 – Jenkins console output

With that, we’re able to run a Docker build using a scalable Jenkins server. As we can see, we’ve set up polling on the SCM settings to look for changes every minute and build the job if we detect any. However, this is resource-intensive and does not help in the long run. Just imagine that you have hundreds of jobs interacting with multiple GitHub repositories, and the Jenkins controller is polling them every minute. A better approach would be if GitHub could trigger a post-commit webhook on Jenkins. Here, Jenkins can build the job whenever there are changes in the repository. We’ll look at that scenario in the next section.

Installing Jenkins – Continuous Integration with GitHub Actions and Jenkins-1

As we’re running on a Kubernetes cluster, we only need the latest official Jenkins image from Docker Hub. We will customize the image according to our requirements.

The following Dockerfile file will help us create the image with the required plugins and the initial configuration:
FROM jenkins/jenkins
ENV CASC_JENKINS_CONFIG /usr/local/casc.yaml
ENV JAVA_OPTS -Djenkins.install.runSetupWizard=false
COPY casc.yaml /usr/local/casc.yaml
COPY plugins.txt /usr/share/jenkins/ref/plugins.txt
RUN jenkins-plugin-cli –plugin-file /usr/share/jenkins/ref/plugins.txt

The Dockerfile starts from the Jenkins base image. Then, we declare two environment variables – CASC_JENKINS_CONFIG, which points to the casc.yaml file we defined in the previous section, and JAVA_OPTS, which tells Jenkins not to run the setup wizard. Then, we copy the casc.yaml and plugins.txt files to their respective directories within the Jenkins container. Finally, we run jenkins-plugins-cli on the plugins.txt file, which installs the required plugins.

The plugins.txt file contains a list of all Jenkins plugins that we will need in this setup.

Tip

You can customize and install more plugins for the controller image based on your requirements by updating the plugins.txt file.

Let’s build the image from the Dockerfile file using the following command:
$ docker build -t /jenkins-controller-kaniko .

Now that we’ve built the image, use the following command to log in and push the image to Docker Hub:
$ docker login
$ docker push /jenkins-controller-kaniko

We must also build the Jenkins agent image to run our builds. Remember that Jenkins agents need all the supporting tools you need to run your builds. You can find the resources for the agents in the following directory:
$ cd ~/modern-devops/ch11/jenkins/jenkins-agent

We will use the following Dockerfile to do that:
FROM gcr.io/kaniko-project/executor:v1.13.0 as kaniko
FROM jenkins/inbound-agent
COPY –from=kaniko /kaniko /kaniko
WORKDIR /kaniko
USER root

ThisDockerfile uses a multi-stage build to take the kaniko base image and copy the kaniko binary from the kaniko base image to the inbound-agent base image. Let’s go ahead and build and push the container using the following commands:
$ docker build -t /jenkins-jnlp-kaniko .
$ docker push /jenkins-jnlp-kaniko

To deploy Jenkins on our Kubernetes cluster, we will first create a jenkins service account. A Kubernetes service account resource helps pods authenticate with the Kubernetes API server. We will give the service account permission to interact with the Kubernetes API server as cluster-admin using a cluster role binding. A Kubernetes ClusterRoleBinding resource helps provide permissions to a service account to perform certain actions in the Kubernetes cluster. The jenkins-sa-crb. yaml manifest describes this. To access these resources, run the following command:
$ cd ~/modern-devops/ch11/jenkins/jenkins-controller

To apply the manifest, run the following command:
$ kubectl apply -f jenkins-sa-crb.yaml

Connecting Jenkins with the cluster – Continuous Integration with GitHub Actions and Jenkins

We will install the Kubernetes plugin to connect the Jenkins controller with the cluster. We’re doing this because we want Jenkins to dynamically spin up agents for builds as Kubernetes pods.

We will start by creating a kubernetes configuration under jenkins.clouds, as follows:
jenkins
clouds:
kubernetes:
serverUrl: “https://”
jenkinsUrl: “http://jenkins-service:8080”
jenkinsTunnel: “jenkins-service:50000”
skipTlsVerify: false
useJenkinsProxy: false
maxRequestsPerHost: 32
name: “kubernetes”
readTimeout: 15
podLabels:
key: jenkins
value: agent

As we have a placeholder called within the configuration, we must replace this with the Kubernetes control plane’s IP address. Run the following command to fetch the control plane’s IP address:
$ kubectl cluster-info | grep “control plane”

Kubernetes control plane is running at https://35.224.6.58

Now, replace the placeholder with the actual IP address you obtained from the preceding command by using the following command:
$ sed -i ‘s//actual_ip/g’ casc.yaml

Let’s look at each attribute in the config file:
• serverUrl: This denotes the Kubernetes control plane server URL, allowing the Jenkins controller to communicate with the Kubernetes API server.
• jenkinsUrl: This denotes the Jenkins controller URL. We’ve set it to http://jenkins-service:8080.
• jenkinsTunnel: This describes how the agent pods will connect with the Jenkins controller. As the JNLP port is 50000, we’ve set it to jenkins-service:50000.
• podLabels: We’ve also set up some pod labels, key=jenkins and value=agent. These will be set on the agent pods.

Other attributes are also set to their default values.

Every Kubernetes cloud configuration consists of multiple pod templates describing how the agent pods will be configured. The configuration looks like this:
kubernetes:
templates:
name: “jenkins-agent”
label: “jenkins-agent”
hostNetwork: false
nodeUsageMode: “NORMAL”
serviceAccount: “jenkins” imagePullSecrets:
name: regcred yamlMergeStrategy: “override” containers:

Here, we’ve defined the following:
• The template’s name and label. We set both to jenkins-agent.
• hostNetwork: This is set tofalse as we don’t want the container to interact with the host network.
• seviceAccount: We’ve set this to jenkins as we want to use this service account to interact with Kubernetes.
• imagePullSecrets: We have also provided an image pull secret called regcred to authenticate with the container registry to pull the jnlp image.

Every pod template also contains a container template. We can define that using the following configuration:

containers:
name: jnlp
image: “/jenkins-jnlp-kaniko”
workingDir: “/home/jenkins/agent”
command: “”
args: “” livenessProbe:
failureThreshold: 1
initialDelaySeconds: 2
periodSeconds: 3
successThreshold: 4
timeoutSeconds: 5
volumes:
secretVolume:
mountPath: /kaniko/.docker
secretName: regcred

Here, we have specified the following:
• name: Set to jnlp.
• image: Here, we’ve specified the Docker agent image we will build in the next section. Ensure that you replace the placeholder with your Docker Hub user by using the following command:

$ sed -i ‘s//actual_dockerhub_user/g’ casc.yaml
• workingDir: Set to /home/jenkins/agent.
• We’ve set the command and args fields to blank as we don’t need to pass them.
• livenessProbe: We’ve defined a liveness probe for the agent pod.
• volumes: We’ve mounted the regcred secret to the kaniko/.docker file as a volume. As regcred contains the Docker registry credentials, Kaniko will use this to connect with your container registry.

Now that our configuration file is ready, we’ll go ahead and install Jenkins in the next section.

Spinning up Google Kubernetes Engine – Continuous Integration with GitHub Actions and Jenkins

Once you’ve signed up and are in your console, open the Google Cloud Shell CLI to run the following commands.

You need to enable the Kubernetes Engine API first using the following command:

$ gcloud services enable container.googleapis.com

To create a two-node autoscaling GKE cluster that scales from one to five nodes, run the following command:

$ gcloud container clusters create cluster-1 –num-nodes 2 \

–enable-autoscaling –min-nodes 1 –max-nodes 5 –zone us-central1-a

And that’s it! The cluster will be up and running.

You must also clone the following GitHub repository for some of the exercises provided: https:// github.com/PacktPublishing/Modern-DevOps-Practices-2e.

Run the following command to clone the repository into your home directory and cd into the following directory to access the required resources:

$ git clone https://github.com/PacktPublishing/Modern-DevOps-Practices-2e.git \ modern-devops

$ cd modern-devops/ch11/jenkins/jenkins-controller

We will use the Jenkins Configuration as Code feature to configure Jenkins as it is a declarative way of managing your configuration and is also GitOps-friendly. You need to create a simple YAML file with all the required configurations and then copy the file to the Jenkins controller after setting an environment variable that points to the file. Jenkins will then automatically configure all aspects defined in the YAML file on bootup.

Let’s start by creating the casc.yaml file to define our configuration.

Creating the Jenkins CaC (JCasC) file

The Jenkins CaC (JCasC) file is a simple YAML file that helps us define Jenkins configuration declaratively. We will create a single casc.yaml file for that purpose, and I will explain parts of it. Let’s start by defining Jenkins Global Security.

Configuring Jenkins Global Security

By default Jenkins is insecure – that is, if you fire up a vanilla Jenkins from the official Docker image and expose it, anyone can do anything with that Jenkins instance. To ensure that we protect it, we need the following configuration:

jenkins:
remotingSecurity:
enabled: true
securityRealm:
local:
allowsSignup: false
users:
id: ${JENKINS_ADMIN_ID}
password: ${JENKINS_ADMIN_PASSWORD}
authorizationStrategy:
globalMatrix:
permissions:
“Overall/Administer:admin”
“Overall/Read:authenticated”

In the preceding configuration, we’ve defined the following:

  • remotingSecurity: We’ve enabled this feature, which will secure the communication between the Jenkins controller and agents that we will create dynamically using Kubernetes.
  • securityRealm: We’ve set the security realm to local, which means that the Jenkins controller itself will do all authentication and user management. We could have also offloaded this to an external entity such as LDAP:
  • allowsSignup: This is set tofalse. This means you don’t see a sign-up link on the Jenkins home page, and the Jenkins admin should manually create users.
  • users: We’ll create a single user with id and password sourced from two environment variables called JENKINS_ADMIN_ID and JENKINS_ADMIN_PASSWORD, respectively.
  • authorizationStrategy: We’ve defined a matrix-based authorization strategy where we provide administrator privileges to admin and read privileges to authenticated non-admin users.

Also, as we want Jenkins to execute all their builds in the agents and not the controller machine, we need to specify the following settings:

jenkins:
systemMessage: “Welcome to Jenkins!”
numExecutors: 0

We’ve set numExecutors to 0 to allow no builds on the controller and also set systemMessage on the Jenkins welcome screen.

Now that we’ve set up the security aspects of the Jenkins controller, we will configure Jenkins to connect with the Kubernetes cluster.

Scalable Jenkins on Kubernetes with Kaniko – Continuous Integration with GitHub Actions and Jenkins-2

Jenkins follows a controller-agent model. Though technically, you can run all your builds on the controller machine itself, it makes sense to offload your CI builds to other servers in your network to have a distributed architecture. This does not overload your controller machine. You can use it to store the build configurations and other management data and manage the entire CI build cluster, something along the lines of what’s shown in the following diagram:

Figure 11.7 – Scalable Jenkins

In the preceding diagram, multiple static Jenkins agents connect to a Jenkins controller. Now, this architecture works well, but it needs to be more scalable. Modern DevOps emphasizes resource utilization, so we only want to roll out an agent machine when we want to build. Therefore, automating your builds to roll out an agent machine when required is a better way to do it. This might be overkill when rolling out new virtual machines, as it takes some minutes to provision a new VM, even when using a prebuilt image with Packer. A better alternative is to use a container.

Jenkins integrates quite well with Kubernetes, allowing you to run your build on a Kubernetes cluster. That way, whenever you trigger a build on Jenkins, Jenkins instructs Kubernetes to create a new agent container that will then connect with the controller machine and run the build within itself. This is build on-demand at its best. The following diagram shows this process in detail:

Figure 11.8 – Scalable Jenkins CI workflow

This sounds great, and we cango ahead and run this build, but there are issues with this approach. We must understand that the Jenkins controller and agents run as containers and aren’t full-fledged virtual machines. Therefore, if we want to run a Docker build within the container, we must run the container in privileged mode. This isn’t a security best practice, and your admin should already have turned that off. This is because running a container in privileged mode exposes your host filesystem to the container. A hacker who can access your container will have full access so that they can do whatever they want in your system.

To solve that problem, you can use a container build tool such as Kaniko. Kaniko is a build tool provided by Google that helps you build your containers without access to the Docker daemon, and you do not even need Docker installed in your container. It is a great way to run your builds within a Kubernetes cluster and create a scalable CI environment. It is effortless, not hacky, and provides a secure method of building your containers, as we will see in the subsequent sections.

This section willuse Google Kubernetes Engine (GKE ). As mentioned previously, Google Cloud provides a free trial worth $300 for 90 days. You can sign up at https://cloud.google.com/ free if you have not already done so.

Scalable Jenkins on Kubernetes with Kaniko – Continuous Integration with GitHub Actions and Jenkins-1

Imagine you’re running a workshop where you build all sorts of machines. In this workshop, you have a magical conveyor belt called Jenkins for assembling these machines. But to make your workshop even more efficient and adaptable, you’ve got a team of tiny robot workers called Kaniko that assist in constructing the individual parts of each machine. Let’s draw parallels between this workshop analogy and the technology world:

  • Scalable Jenkins: Jenkins is a widely used automation server that helps automate various tasks, particularly those related to building, testing, and deploying software. “Scalable Jenkins” means configuring Jenkins in a way that allows it to efficiently handle a growing workload, much like having a spacious workshop capable of producing numerous machines.
  • Kubernetes: Think of Kubernetesas the workshop manager. It’s an orchestration platform that automates the process of deploying, scaling, and managing containerized applications. Kubernetes ensures that Jenkins and the team of tiny robots (Kaniko) work seamlessly together and can adapt to changing demands.
  • Kaniko: Kaniko is equivalent to your team of miniature robot workers. In the context of containerization, Kaniko is a tool that aids in building container images, which are akin to the individual parts of your machines. What makes Kaniko special is that it can do this without needing elevated access to the Docker daemon. Unlike traditional container builders, Kaniko doesn’t require special privileges, making it a more secure choice for constructing containers, especially within a Kubernetes environment.

Now, let’s combine the three tools and see what we can achieve:

  • Building containers at scale: Your workshop can manufacture multiple machines simultaneously, thanks to Jenkins and the tiny robots. Similarly, with Jenkins on Kubernetes using Kaniko, you can efficiently and concurrently create container images. This ability to scale is crucial in modern application development, where containerization plays a pivotal role.
  • Isolation and security: Just as Kaniko’s tiny robots operate within a controlled environment, Kaniko ensures that container image building takes place in an isolated and secure manner within a Kubernetes cluster. This means that different teams or projects can use Jenkins and Kaniko without interfering with each other’s container-building processes.
  • Consistency and automation: Similar to how the conveyor belt (Jenkins) guarantees consistent machine assembly, Jenkins on Kubernetes with Kaniko ensures uniform container image construction. Automation is at the heart of this setup, simplifying the process of building and managing container images for applications.

To summarize, scalable Jenkins on Kubernetes with Kaniko refers to the practice of setting up Jenkins to efficiently build and manage container images using Kaniko within a Kubernetes environment. It enables consistent, parallel, and secure construction of container images, aligning perfectly with modern software development workflows.

So, the analogy of a workshop with Jenkins, Kubernetes, and Kaniko vividly illustrates how this setup streamlines container image building, making it scalable, efficient, and secure for contemporary software development practices. Now, let’s dive deeper into Jenkins.

Jenkins is the most popular CI tool available in the market. It is open source, simple to install, and runs with ease. It is a Java -based tool with a plugin-based architecture designed to support several integrations, such as with a source code management tool such as Git, SVN, and Mercurial, or with popular artifact repositories such as Nexus and Artifactory. It also integrates well with well-known build tools such as Ant, Maven, and Gradle, aside from the standard shell scripting and Windows batch file executions.