Search for:
Introduction to the sample microservices-based blogging application – Blog App – Continuous Integration with GitHub Actions and Jenkins

Blog App is a sample modern microservices- based blogging web application that allows users to create, manage, and interact with blog posts. It caters to both authors and readers. Users can sign up to this platform using their email addresses and start writing blog posts. Readers can publicly view all blog posts created by several authors, and logged-in users can also provide reviews and ratings.

The application is written in a popular Python-based web framework called Flask and uses MongoDB as the database. The application is split into several microservices for user, post, review, and rating management. There is a separate frontend microservice that allows for user interaction. Let’s look at each microservice:

  • User Management: The User Management microservice provides endpoints to create a user account, update the profile (name and password), and delete a user account.
  • Posts Management: The Posts Management microservice provides endpoints to create, list, get, update, and delete posts.
  • Reviews Management: The Reviews Management microservice allows users to add reviews on posts and update and delete them. Internally, it interacts with the Ratings Management microservice to manage the ratings provided, along with the reviews.
  • Ratings Management: The Ratings Management microservice manages ratings for posts associated with a particular review. This microservice is called from the Reviews Management microservice internally and is not exposed to the Frontend microservice.
  • Frontend: The Frontend microservice is a Python Flask user interface application built using Bootstrap, which provides users with a rich and interactive user interface. It allows users to sign up, log in, view, and navigate between posts, edit their posts, add and update reviews, and manage their profiles. The microservice interacts with the backend microservices seamlessly using HTTP requests.

The users, posts, reviews, and ratings microservices interact with MongoDB as the database.

The following service diagram shows the interactions graphically:

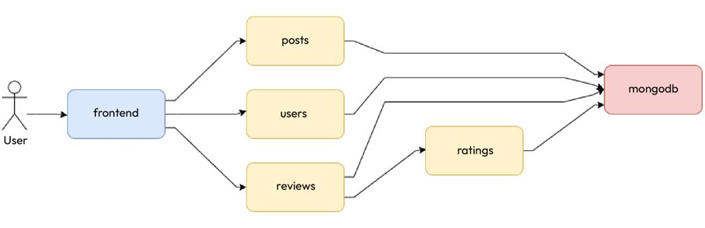
Figure 11.1 – Blog App services and interactions

As we can see, the individual microservices are fairly decoupled from each other and, therefore, can independently scale. It is also robust because the other parts of the application will work if a particular microservice is not working. The individual microservices can be independently developed and deployed as separate components, adding to the application’s flexibility and maintainability. This application is an excellent example of leveraging microservices to build a modern, feature-rich web application.

Now, let’s implement CI for this application. To implement CI, we will need a CI tool. We’ll look at some of the popular tools and the options you have in the next section.

The importance of automation – Continuous Integration with GitHub Actions and Jenkins-2

In the tech realm, automation is the bedrock of modern IT operations, spanning from automating software deployments to managing cloud resources and configuring network devices. It empowers organizations to streamline processes, enhance reliability, and remain competitive in the fast-paced digital landscape.

In essence, automation resembles an exceedingly efficient, error-free, round-the-clock workforce that empowers individuals and organizations to accomplish more with less effort.

To benefit from automation, the project management function is quickly diluting, and software development teams are transitioning to Agile teams that deliver in Sprints iteratively. Therefore, if there is a new requirement, we don’t wait for the entire thing to be signed off before we start doing design, development, QA, and so on. Instead, we break software into workable features and deliver them in smaller chunks to get value and customer feedback quickly. That means rapid software development with less risk of failure.

Well, the teams are agile, and they develop software faster. Still, many things in the software development life cycle (SDLC ) process are conducted manually, such as the fact that some teams generate CodeBuilds only after completing the entire development for that cycle and later find numerous bugs. It becomes difficult to trace what caused that problem in the first place.

What if you could know the cause of a broken Build as soon as you check the code into source control? What if you understand that the software fails some tests as soon as the builds are executed? Well, that’s CI for you in a nutshell.

CI is a process through which developers frequently check code into a source code repository, perhaps several times a day. Automated tooling behind the scenes can detect these commits and then build, run some tests, and tell you upfront whether the commit has caused any issues. This means that your developers, testers, product owners, operations team, and everyone comes to know what has caused the problem, and the developer can fix it quickly. This creates a feedback loop in software development. We always had a manual feedback loop within software development, which was slow. So, either you wait a long time before doing your next task or do the wrong thing until you realize it is too late to undo all of that. This adds to the rework effort of everything you have done hitherto.

As we all know, fixing a bug earlier in the SDLC cycle is cheaper than fixing it later. Therefore, CI aims to provide continuous feedback on the code quality early in the SDLC. This saves your developers and the organization a lot of time and money on fixing bugs they detect when most of your code is tested. Therefore, CI helps software development teams develop better software faster.

Since we’ve mentioned Agile, let’s briefly discuss how it compares with DevOps. Agile is a way of working and is silent on the tools, techniques, and automation required to achieve it. DevOps is an extension of the Agile mindset and helps you implement it effectively. DevOps focuses heavily on automation and looks at avoiding manual work wherever possible. It also encourages software delivery automation and seeks to amplify or replace traditional tools and frameworks. With the advent of modern DevOps, specific tools, techniques, and best practices simplify the life of a developer, QA, and operator. Modern public cloud platforms and DevOps provide teams with ready-to-use dynamic infrastructure that helps businesses reduce the time to market and build scalable, elastic, high-performing infrastructure to keep enterprises live with minimal downtime.

When introducing modern DevOps in the first chapter, we discussed that it usually applies to modern cloud-native applications. I’ve built an example microservices-based Blog App to demonstrate this. We will use this application in this and future chapters of this book to ensure seamless development and delivery of this application using modern DevOps tools and practices. We’ll look at the sample application in the next section.

The importance of automation – Continuous Integration with GitHub Actions and Jenkins-1

In the previous chapters, we looked at individual tools that will help us implement several aspects of modern DevOps. Now, it’s time to look at how we can combine all the tools and concepts we’ve learned about and use them to create a continuous integration (CI) pipeline. First, we will introduce a sample microservices-based blogging application, Blog App, and then look at some popular open source and SaaS-based tools that can get us started quickly with CI. We will begin with GitHub Actions and then move on to Jenkins with Kaniko. For every tool, we will implement CI for Blog App. We will try to keep the implementations cloud-agnostic. Since we’ve used the GitOps approach from the beginning, we will also use the same here. Finally, we will cover some best practices related to build performance.

In this chapter, we’re going to cover the following main topics:

  • The importance of automation
  • Introduction to the sample microservices-based blogging application – Blog App
  • Building a CI pipeline with GitHub Actions
  • Scalable Jenkins on Kubernetes with Kaniko
  • Automating a build with triggers
  • Build performance best practices

Technical requirements

For this chapter, you will need to clone the following GitHub repository for some of the exercises: https://github.com/PacktPublishing/Modern-DevOps-Practices-2e.

Run the following command to clone the repository into your home directory, and cd into the ch11 directory to access the required resources:

$ git clone https://github.com/PacktPublishing/Modern-DevOps-Practices-2e.git \ modern-devops

$ cd modern-devops/ch11

So, let’s get started!

The importance of automation

Automation is akin to having an efficient team of robots at your disposal, tirelessly handling repetitive, time-consuming, and error-prone tasks. Let’s simplify the significance of automation:

  • Efficiency: Think of it as having a magical helper who completes tasks in a fraction of the time you would take. Automation accelerates repetitive tasks, executing actions, processing data, and running commands far more swiftly than humans.
  • Consistency: Humans can tire or become distracted, leading to inconsistencies in task execution. Automation guarantees that tasks are consistently carried out according to predefined rules, every single time.
  • Accuracy: Automation operates without the fatigue or lapses that humans may experience. It adheres to instructions with precision, minimizing the likelihood of errors that could result in costly repercussions.
  • Scale: Whether managing one system or a thousand, automation effortlessly scales operations without additional human resources.
  • Cost savings: By reducing the reliance on manual labor, automation yields significant cost savings in terms of time and human resources.
  • Risk reduction: Certain tasks, such as making data backups and performing security checks, are crucial but can be overlooked or skipped by humans. Automation ensures these tasks are consistently performed, mitigating risks.
  • Faster response: Automation detects and responds to issues in real time. For instance, it can automatically restart a crashed server or adjust resource allocation during high traffic, ensuring uninterrupted user experiences.
  • Resource allocation: Automating routine tasks liberates human resources to concentrate on more strategic and creative endeavors that require critical thinking and decision-making.
  • Compliance: Automation enforces and monitors compliance with policies and regulations, reducing the potential for legal and regulatory complications.
  • Data analysis: Automation processes and analyzes vast data volumes rapidly, enabling data-driven decision-making and insights.
  • 24/7 operations: Automation operates tirelessly, 24/7, guaranteeing continuous operations and availability.
  • Adaptability: Automation can be reprogrammed to adapt to evolving requirements and environments, making it versatile and future-proof.
Creating the required infrastructure with Terraform – Immutable Infrastructure with Packer-2

Now, we will define the VM scale set within the resource group using the custom image and the load balancer we defined before:
resource “azurerm_virtual_machine_scale_set” “main” {
name = “webscaleset”
location = var.location
resource_group_name = azurerm_resource_group.main.name upgrade_policy_mode = “Manual” sku {
name = “Standard_DS1_v2”
tier = “Standard”
capacity = 2
}
storage_profile_image_reference {
id=data.azurerm_image.websig.id
}

We then go ahead and define the OS disk and the data disk:
storage_profile_os_disk {
name = “”
caching = “ReadWrite”
create_option = “FromImage”
managed_disk_type = “Standard_LRS”
}
storage_profile_data_disk {
lun = 0
caching = “ReadWrite”
create_option = “Empty”
disk_size_gb = 10
}

The OS profile defines how we log in to the VM:
os_profile {
computer_name_prefix = “web”
admin_username
admin_password
= var.admin_username
= var.admin_password
}
os_profile_linux_config {
disable_password_authentication = false
}

We then define a network profile that will associate the scale set with the load balancer we defined before:
network_profile {
name = “webnp”
primary = true
ip_configuration {
name = “IPConfiguration”
subnet_id = azurerm_subnet.main.id
load_balancer_backend_address_pool_ids = [azurerm_lb_backend_address_pool.bpepool.
id]
primary = true
}
}
tags = {}
}

Now, moving on to the database configuration, we will start by defining a network security group for the database servers to allow ports 22 and 3306 from internal servers within the virtual network:
resource “azurerm_network_security_group” “db_nsg” {
name = “db-nsg”
location = var.location
resource_group_name = azurerm_resource_group.main.name
security_rule {
name = “SSH”
priority = 1001
direction = “Inbound”
access = “Allow”
protocol = “Tcp”
source_port_range = “” destination_port_range = “22” source_address_prefix = “
destination_address_prefix = “” } security_rule { name = “SQL” priority = 1002 direction = “Inbound” access = “Allow” protocol = “Tcp” source_port_range = “
destination_port_range = “3306”
source_address_prefix = “” destination_address_prefix = “
}
tags = {}
}

We then define a NIC to provide an internal IP to the VM:
resource “azurerm_network_interface” “db” {
name = “db-nic”
location = var.location
resource_group_name = azurerm_resource_group.main.name ip_configuration {
name
subnet_id
= “db-ipconfiguration”
= azurerm_subnet.main.id
330
private_ip_address_allocation = “Dynamic”
}
}

We will then associate the network security group to the network interface:
resource “azurerm_network_interface_security_group_association” “db” {
network_interface_id = azurerm_network_interface.db.id
network_security_group_id = azurerm_network_security_group.db_nsg.id
}

Finally, we’ll define the database VM using the custom image:
resource “azurerm_virtual_machine” “db” {
name = “db”
location = var.location
resource_group_name = azurerm_resource_group.main.name
network_interface_ids = [azurerm_network_interface.db.id]
vm_size = var.vm_size
delete_os_disk_on_termination = true
storage_image_reference {
id = data.azurerm_image.dbsig.id
}
storage_os_disk {
name = “db-osdisk”
caching = “ReadWrite”
create_option = “FromImage”
managed_disk_type = “Standard_LRS”
}
os_profile {
computer_name = “db”
admin_username = var.admin_username
admin_password = var.admin_password
}
os_profile_linux_config {
disable_password_authentication = false
}
tags = {}
}

Now, as we’ve defined everything we needed, fill the terraform.tfvars file with the required information, and go ahead and initialize our Terraform workspace by using the following command:
$ terraform init

As Terraform has initialized successfully, use the following command to apply the Terraform configuration:
$ terraform apply

Apply complete! Resources: 13 added, 0 changed, 0 destroyed.

Outputs:
web_ip_addr = “40.115.61.69”

As Terraform has applied the configuration and provided the load balancer IP address as an output, let’s use that to navigate to the web server:

Figure 10.4 – LAMP stack working correctly

As we get the Database Connected successfully message, we see that the configuration is successful! We’ve successfully created a scalable LAMP stack using Packer, Ansible, and Terraform. It combines IaC, configuration as code, immutable infrastructure, and modern DevOps practices to create a seamless environment without manual intervention.

Summary

In this chapter, we have covered immutable infrastructure with Packer. We used Packer with the Ansible provisioner to build custom images for Apache and MySQL. We used the custom images to create a scalable LAMP stack using Terraform. The chapter introduced you to the era of modern DevOps, where everything is automated. We follow the same principles for building and deploying all kinds of infrastructure, be it containers or VMs. In the next chapter, we will discuss one of the most important topics of DevOps – continuous integration.

Creating the required infrastructure with Terraform – Immutable Infrastructure with Packer-1

Our goal was to build a scalable LAMP stack, so we will define a VM scale set using the apache-webserver image we created and a single VM with the mysql-dbserver image. A VM scale set is an autoscaling group of VMs that will scale out and scale back horizontally based on traffic, similar to how we did with containers on Kubernetes.

We will create the following resources:
• A new resource group called lamp-rg
• A virtual network within the resource group called lampvnet
• A subnet within lampvnet called lampsub
• Within the subnet, we create a Network Interface Card (NIC) for the database called db-nic that contains the following:

A network security group called db-nsg
A VM called db that uses the custom mysql-dbserver image

• We then create a VM scale set that includes the following:
A network profile called webnp
A backend address pool
A load balancer called web-lb
A public IP address attached to web-lb
An HTTP probe that checks the health of port 80

The following figure explains the topology graphically:

Figure 10.3 – Scalable LAMP stack topology diagram

To access resources for this section, switch to the following directory:
$ cd ~/modern-devops/ch10/terraform

We use the following Terraform template, main.tf, to define the configuration.

We first define the Terraform providers:
terraform {
required_providers {
azurerm = {
source = “azurerm”
}
}
}
provider “azurerm” {
subscription_id = var.subscription_id
client_id = var.client_id
client_secret = var.client_secret
tenant_id = var.tenant_id
}

We then define the custom image data sources so that we can use them within our configuration:
data “azurerm_image” “websig” {
name = “apache-webserver”
resource_group_name = “packer-rg”
}
data “azurerm_image” “dbsig” {
name = “mysql-dbserver”
resource_group_name = “packer-rg”
}

We then define the resource group, virtual network, and subnet:
resource “azurerm_resource_group” “main” {
name = var.rg_name
location = var.location
}
resource “azurerm_virtual_network” “main” {
name = “lampvnet”
address_space = [“10.0.0.0/16”]
location = var.location
resource_group_name = azurerm_resource_group.main.name
}
resource “azurerm_subnet” “main” {
name = “lampsub”
resource_group_name = azurerm_resource_group.main.name
virtual_network_name = azurerm_virtual_network.main.name
address_prefixes = [“10.0.2.0/24”]
}

As the Apache web servers will remain behind a network load balancer, we will define the load balancer and the public IP address that we will attach to it:
resource “azurerm_public_ip” “main” {
name = “webip”
location = var.location
resource_group_name = azurerm_resource_group.main.name
allocation_method = “Static”
domain_name_label = azurerm_resource_group.main.name
}
resource “azurerm_lb” “main” {
name = “web-lb”
location = var.location
resource_group_name = azurerm_resource_group.main.name frontend_ip_configuration {
name = “PublicIPAddress”
public_ip_address_id = azurerm_public_ip.main.id
}
tags = {}
}

We will then define a backend address pool to the load balancer so that we can use this within the

Apache VM scale set:
resource “azurerm_lb_backend_address_pool” “bpepool” {
loadbalancer_id
= azurerm_lb.main.id
name
= “BackEndAddressPool”
}

We will define an HTTP probe on port 80 for a health check and attach it to the load balancer:
resource “azurerm_lb_probe” “main” {
loadbalancer_id
= azurerm_lb.main.id
name
= “http-running-probe”
port
= 80
}

We need a NAT rule to map the load balancer ports to the backend pool port, and therefore, we will define a load balancer rule that will map port 80 on the load balancer with port 80 of the backend pool VMs. We will also attach the HTTP health check probe in this config:
resource “azurerm_lb_rule” “lbnatrule” {
resource_group_name = azurerm_resource_group.main.name
loadbalancer_id = azurerm_lb.main.id
name = “http”
protocol = “Tcp”
frontend_port = 80
backend_port = 80
backend_address_pool_ids = [ azurerm_lb_backend_address_pool.bpepool.id ]
frontend_ip_configuration_name = “PublicIPAddress”
probe_id = azurerm_lb_probe.main.id
}

The Packer workflow for building images – Immutable Infrastructure with Packer

The Packer workflow comprises two steps – init and build.

As we already know, Packer uses plugins to interact with the cloud providers; therefore, we need to install them. To do so, Packer provides the init command.

Let’s initialize and install the required plugins using the following command:
$ packer init .

Installed plugin github.com/hashicorp/ansible v1.1.0 in “~/.config/packer/plugins/github. com/hashicorp/ansible/packer-plugin-ansible_v1.1.0_x5.0_linux_amd64”

Installed plugin github.com/hashicorp/azure v1.4.5 in “~/.config/packer/plugins/github. com/hashicorp/azure/packer-plugin-azure_v1.4.5_x5.0_linux_amd64”

As we can see, the plugin is now installed. Let’s now go ahead and build the image.

We use the build command to create an image using Packer. As we would need to pass values to variables, we will specify the variable values using a command-line argument, as in the following command:
$ packer build -var-file=”variables.pkrvars.hcl” .

Packer would build parallel stacks using both the webserver and dbserver configs.

Packer first creates temporary resource groups to spin up staging VMs:
==> azure-arm.webserver: Creating resource group …
==> azure-arm.webserver: -> ResourceGroupName : ‘pkr-Resource-Group-7dfj1c2iej’
==> azure-arm.webserver: -> Location : ‘East US’
==> azure-arm.dbserver: Creating resource group …
==> azure-arm.dbserver: -> ResourceGroupName : ‘pkr-Resource-Group-11xqpuxsm3’
==> azure-arm.dbserver: -> Location : ‘East US’

Packer then validates and deploys the deployment templates and gets the IP addresses of the staging VMs:
==> azure-arm.webserver: Validating deployment template …
==> azure-arm.webserver: Deploying deployment template …
==> azure-arm.webserver: -> DeploymentName : ‘pkrdp7dfj1c2iej’
==> azure-arm.webserver: Getting the VM’s IP address …
==> azure-arm.webserver: -> IP Address : ‘104.41.158.85’
==> azure-arm.dbserver: Validating deployment template …
==> azure-arm.dbserver: Deploying deployment template …
==> azure-arm.dbserver: -> DeploymentName : ‘pkrdp11xqpuxsm3’
==> azure-arm.dbserver: Getting the VM’s IP address …
==> azure-arm.dbserver: -> IP Address : ‘40.114.7.11’

Then, Packer uses SSH to connect with the staging VMs and provisions them with Ansible:
==> azure-arm.webserver: Waiting for SSH to become available…
==> azure-arm.dbserver: Waiting for SSH to become available…
==> azure-arm.webserver: Connected to SSH!
==> azure-arm.dbserver: Connected to SSH!
==> azure-arm.webserver: Provisioning with Ansible…
==> azure-arm.dbserver: Provisioning with Ansible…
==> azure-arm.webserver: Executing Ansible: ansible-playbook -e packer_build_ name=”webserver” -e packer_builder_type=azure-arm –ssh-extra-args ‘-o IdentitiesOnly=yes’ -e ansible_ssh_private_key_file=/tmp/ansible-key328774773 -i /tmp/packer-provisioner-ansible747322992 ~/ansible/webserver-playbook.yaml
==> azure-arm.dbserver: Executing Ansible: ansible-playbook -e packer_build_ name=”dbserver” -e packer_builder_type=azure-arm –ssh-extra-args ‘-o IdentitiesOnly=yes’ -e ansible_ssh_private_key_file=/tmp/ansible-key906086565 -i /tmp/packer-provisioner-ansible3847259155 ~/ansible/dbserver-playbook.yaml
azure-arm.webserver: PLAY RECAP * **
azure-arm.webserver: default: ok=7 changed=5 unreachable=0 failed=0 skipped=0 rescued=0 ignored=0
azure-arm.dbserver: PLAY RECAP ***
azure-arm.dbserver: default: ok=11 changed=7 unreachable=0 failed=0 skipped=0 rescued=0 ignored=0

Once the Ansible run is complete, Packer gets the disk details, captures the images, and creates the machine images in the resource groups we specified in the Packer configuration:
==> azure-arm.webserver: Querying the machine’s properties
==> azure-arm.dbserver: Querying the machine’s properties
==> azure-arm.webserver: Querying the machine’s additional disks properties …
==> azure-arm.dbserver: Querying the machine’s additional disks properties …
==> azure-arm.webserver: Powering off machine …
==> azure-arm.dbserver: Powering off machine …
==> azure-arm.webserver: Generalizing machine …
==> azure-arm.dbserver: Generalizing machine …
==> azure-arm.webserver: Capturing image …
==> azure-arm.dbserver: Capturing image …
==> azure-arm.webserver: -> Image ResourceGroupName: ‘packer-rg’
==> azure-arm.dbserver: -> Image ResourceGroupName: ‘packer-rg’
==> azure-arm.webserver: -> Image Name: ‘apache-webserver’
==> azure-arm.webserver: -> Image Location: ‘East US’
==> azure-arm.dbserver: -> Image Name: ‘mysql-dbserver’
==> azure-arm.dbserver: -> Image Location: ‘East US’

Finally, it removes the deployment object and the temporary resource group it created:
==> azure-arm.webserver: Deleting Virtual Machine deployment and its attached resources…
==> azure-arm.dbserver: Deleting Virtual Machine deployment and its attached resources…
==> azure-arm.webserver: Cleanup requested, deleting resource group …
==> azure-arm.dbserver: Cleanup requested, deleting resource group …
==> azure-arm.webserver: Resource group has been deleted.
==> azure-arm.dbserver: Resource group has been deleted.

It then provides the list of artifacts it has generated:
==> Builds finished. The artifacts of successful builds are:
–> azure-arm: Azure.ResourceManagement.VMImage:
OSType: Linux
ManagedImageResourceGroupName: packer-rg
ManagedImageName: apache-webserver
ManagedImageId: /subscriptions/Id/resourceGroups/packer-rg/providers/Microsoft.Compute/ images/apache-webserver
ManagedImageLocation: West Europe
OSType: Linux
ManagedImageResourceGroupName: packer-rg
ManagedImageName: mysql-dbserver
ManagedImageId: /subscriptions/Id/resourceGroups/packer-rg/providers/Microsoft.Compute/ images/mysql-dbserver

If we look at the packer-rg resource group, we will find that there are two VM images within it:

Figure 10.2 – Packer custom images

We’ve successfully built custom images with Packer!

Tip

It isn’t possible to rerun Packer with the same managed image name once the image is created in the resource group. That is because we don’t want to override an existing image accidentally. While you can override it by using the -force flag with packer build, you should include a version within the image name to allow multiple versions of the image to exist in the resource group. For example, instead of using apache-webserver, you can use apache-webserver-0.0.1.

It’s time to use these images and create our infrastructure with them now.

Defining the Packer configuration – Immutable Infrastructure with Packer

Packer allows us to define configuration in JSON as well as HCL files. As JSON is now deprecated and HCL is preferred, let’s define the Packer configuration using HCL.

To access resources for this section, switch to the following directory:
$ cd ~/modern-devops/ch10/packer

We will create the following files in the packer directory:
• variables.pkr.hcl: Contains a list of variables we would use while applying the configuration
• plugins.pkr.hcl: Contains the Packer plugin configuration
• webserver.pkr.hcl: Contains the Packer configuration for building the web server image
• dbserver.pkr.hcl: Contains the Packer configuration for building the dbserver image
• variables.pkrvars.hcl: Contains the values of the Packer variables defined in the variables.pkr.hcl file

The variables.pkr.hcl file contains the following:
variable “client_id” {
type = string
}
variable “client_secret” {
type = string
}
variable “subscription_id” {
type = string
}
variable “tenant_id” {
type = string
}

The variables.pkr.hcl file defines a list of user variables that we can use within the source and build blocks of the Packer configuration. We’ve defined four string variables – client_id, client_secret, tenant_id, and subscription_id. We can pass the values of these variables by using the variables.pkrvars.hcl variable file we defined in the last section.

Tip

Always provide sensitive data from external variables, such as a variable file, environment variables, or a secret manager, such as HashiCorp’s Vault. You should never commit sensitive information with code.

The plugins.pkr.hcl file contains the following block:

packer: This section defines the common configuration for Packer. In this case, we’ve defined the plugins required to build the image. There are two plugins defined here – ansible and azure. Plugins contain a source and version attribute. They contain everything you would need to interact with the technology component:
packer {
required_plugins {
ansible = {
source = “github.com/hashicorp/ansible”
version = “=1.1.0”
}
azure = {
source = “github.com/hashicorp/azure”
version = “=1.4.5”
}
}
}

The webserver.pkr.hcl file contains the following sections:

• source: The source block contains the configuration we would use to build the VM. As we build an azure-arm image, we define the source as follows:
source “azure-arm” “webserver” {
client_id = var.client_id
client_secret = var.client_secret
image_offer = “UbuntuServer”
image_publisher = “Canonical”
image_sku = “18.04-LTS”
location = “East US”
managed_image_name = “apache-webserver”
managed_image_resource_group_name = “packer-rg”
os_type = “Linux”
subscription_id = var.subscription_id
tenant_id = var.tenant_id
vm_size = “Standard_DS2_v2”
}

Different types of sources have different attributes that help us connect and authenticate with the cloud provider that the source is associated with. Other attributes define the build VM’s specification and the base image that the build VM will use. It also describes the properties of the custom image we’re trying to create. Since we’re using Azure in this case, its source type is azure-arm and consists of client_id, client_secret, tenant_id, and subscription_id, which helps Packer authenticate with the Azure API server. These attributes’ values are sourced from the variables.pkr.hcl file.

Tip

The managed image name can also contain a version. That will help you build a new image for every new version you want to deploy.

• build: The build block consists of sources and provisioner attributes. It contains all the sources we want to use, and the provisioner attribute allows us to configure the build VM to achieve the desired configuration. We’ve defined the following build block:
build {
sources = [“source.azure-arm.webserver”]
provisioner “ansible” {
playbook_file = “../ansible/webserver-playbook.yaml”
}
}

We’ve defined an Ansible provisioner to customize our VM. There are a lot of provisioners that Packer provides. Luckily, Packer provides the Ansible provisioner out of the box. The Ansible provisioner requires the path to the playbook file; therefore, in this case, we’ve provided ../ansible/ webserver-playbook.yaml.

Tip

You can specify multiple sources in the build block, each with the same or different types. Similarly, we can have numerous provisioners, each executed in parallel. So, if you want to build the same configuration for multiple cloud providers, you can specify multiple sources for each cloud provider.

Similarly, we’ve defined the following dbserver.pkr.hcl file:
source “azure-arm” “dbserver” {

managed_image_name = “mysql-dbserver”

}
build {
sources = [“source.azure-arm.dbserver”]
provisioner “ansible” {
playbook_file = “../ansible/dbserver-playbook.yaml”
}
}

The source block has the same configuration as the web server apart from managed_image_name. The build block is also like the web server, but instead, it uses the ../ansible/dbserver-playbook.yaml playbook.

Now, let’s look at the Packer workflow and how to use it to build the image.

Creating the Apache and MySQL playbooks – Immutable Infrastructure with Packer

As our goal is to spin up a scalable LAMP stack in this chapter, we must start by defining Ansible playbooks that would run on the build VM. We’ve already created some roles for Apache and MySQL in Chapter 9, Configuration Management with Ansible. We will use the same roles within this setup as well.

Therefore, we will have the following directory structure within the ch10 directory:

├── ansible
├── dbserver-playbook.yaml
├── roles
│   ├── apache
│   ├── common
│   └── mysql
└── webserver-playbook.yaml ├── packer
├── dbserver.pkr.hcl
├── plugins.pkr.hcl
├── variables.pkr.hcl
├── variables.pkrvars.hcl
└── webserver.pkr.hcl
└── terraform
├── main.tf
├── outputs.tf
├── terraform.tfvars
└── vars.tf

We have two playbooks within the ansible directory – webserver-playbook.yaml and dbserver-playbook.yaml. Let’s look at each to understand how we write our playbooks for Ansible.

webserver-playbook.yaml looks like the following:

hosts: default
become: true roles:
common
apache

dbserver-playbook.yaml looks like the following:

hosts: default
become: true roles:
common
mysql

As we can see, both playbooks have hosts set to default. That is because we will not define the inventory for this playbook. Instead, Packer will use the build VM to build the image and dynamically generate the inventory.

Note

Packer will also ignore any remote_user attributes within the task and use the user present in the Ansible provisioner’s config.

As we’ve already tested this configuration in the previous chapter, all we need to do now is define the Packer configuration, so let’s go ahead and do that in the next section.

Building the Apache and MySQL images using Packer and Ansible provisioners

We will now use Packer to create the Apache and MySQL images. Before defining the Packer configuration, we have a few prerequisites to allow Packer to build custom images.

Prerequisites

We must create an Azure service principal for Packer to interact with Azure and build the image.

First, log in to your Azure account using the Azure CLI with the following command:

$ az login

Now, set the subscription to the subscription ID we got in response to the az login command to an environment variable using the following:

$ export SUBSCRIPTION_ID=<SUBSCRIPTION_ID>

Next, let’s set the subscription ID using the following command:

$ az account set –subscription=”${SUBSCRIPTION_ID}”

Then, create the service principal with contributor access using the following command:

$ az ad sp create-for-rbac –role=”Contributor” \

–scopes=”/subscriptions/${SUBSCRIPTION_ID}”

{“appId”: “00000000-0000-0000-0000-00000”, “name”: “http://azure-cli-2021-01-07-05-59-24”, “password”: “xxxxxxxxxxxxxxxxxxxxxxxx”, “tenant”: “00000000-0000-0000-0000-0000000000000”}

We’ve successfully created the service principal. The response JSON consists of appId, password, and tenant values that we will use in the subsequent sections.

Note

You can also reuse the service principal we created in Chapter 8, Infrastructure as Code (IaC) with Terraform, instead.

Now, let’s go ahead and set the values of these variables in the packer/variables.pkrvars.

hcl file with the details:

client_id = “”
client_secret = “”
tenant_id = “”
subscription_id = “”

We will use the variable file in our Packer build. We also need a resource group for storing the built images.

To create the resource group, run the following command:

$ az group create -n packer-rg -l eastus

Now, let’s go ahead and define the Packer configuration.

Cons of immutable infrastructure – Immutable Infrastructure with Packer

The cons of immutable infrastructure are as follows:

  • Building and deploying immutable infrastructure is a bit complex, and it is slow to add updates and manage urgent hotfixes
  • There are storage and network overheads in generating and managing VM images

So, as we’ve looked at the pros and cons of both approaches, it ultimately depends on how you currently do infrastructure management and your end goal. Immutable infrastructure has a huge benefit, and therefore, it is something that every modern DevOps engineer should understand and implement if possible. However, technical and process constraints prevent people from doing it – while some constraints are related to the technology stack, most are simply related to processes and red tape. Immutable infrastructure is best when you need consistently reproducible and exceptionally reliable deployments. This approach minimizes the risk of configuration drift and streamlines updates by reconstructing entire environments instead of tweaking existing elements. It proves especially advantageous in scenarios such as microservices architectures, container orchestration, and situations where rapid scaling and the ability to roll back changes are paramount.

We all know that DevOps is not all about tools but it is a cultural change that should originate from the very top. If it is not possible to use immutable infrastructure, you can always use a config management tool such as Ansible on top of live servers. That makes things manageable to a certain extent.

Now, moving on to Packer, let’s look at how to install it.

Installing Packer

You can install Packer on a variety of platforms in a variety of ways. Please refer to https:// developer.hashicorp.com/packer/downloads. As Packer is available as an apt package, use the following commands to install Packer on Ubuntu Linux:

$ wget -O- https://apt.releases.hashicorp.com/gpg | sudo \

gpg –dearmor -o /usr/share/keyrings/hashicorp-archive-keyring.gpg

$ echo “deb [signed-by=/usr/share/keyrings/hashicorp-archive-keyring.gpg] \ https://apt.releases.hashicorp.com $(lsb_release -cs) main” | \ sudo tee /etc/apt/sources.list.d/hashicorp.list

$ sudo apt update && sudo apt install -y packer

To verify the installation, run the following command:

$ packer –version

1.9.2

As we see, Packer is installed successfully. We can proceed with the next activity in our goal – creating playbooks.